DJI Mavic 2 Pro Review
DJI Mavic 2 Pro Review
before we start
if you like it you can but it from amazon from the links below
or you can find the links at the end of the ARTICLE
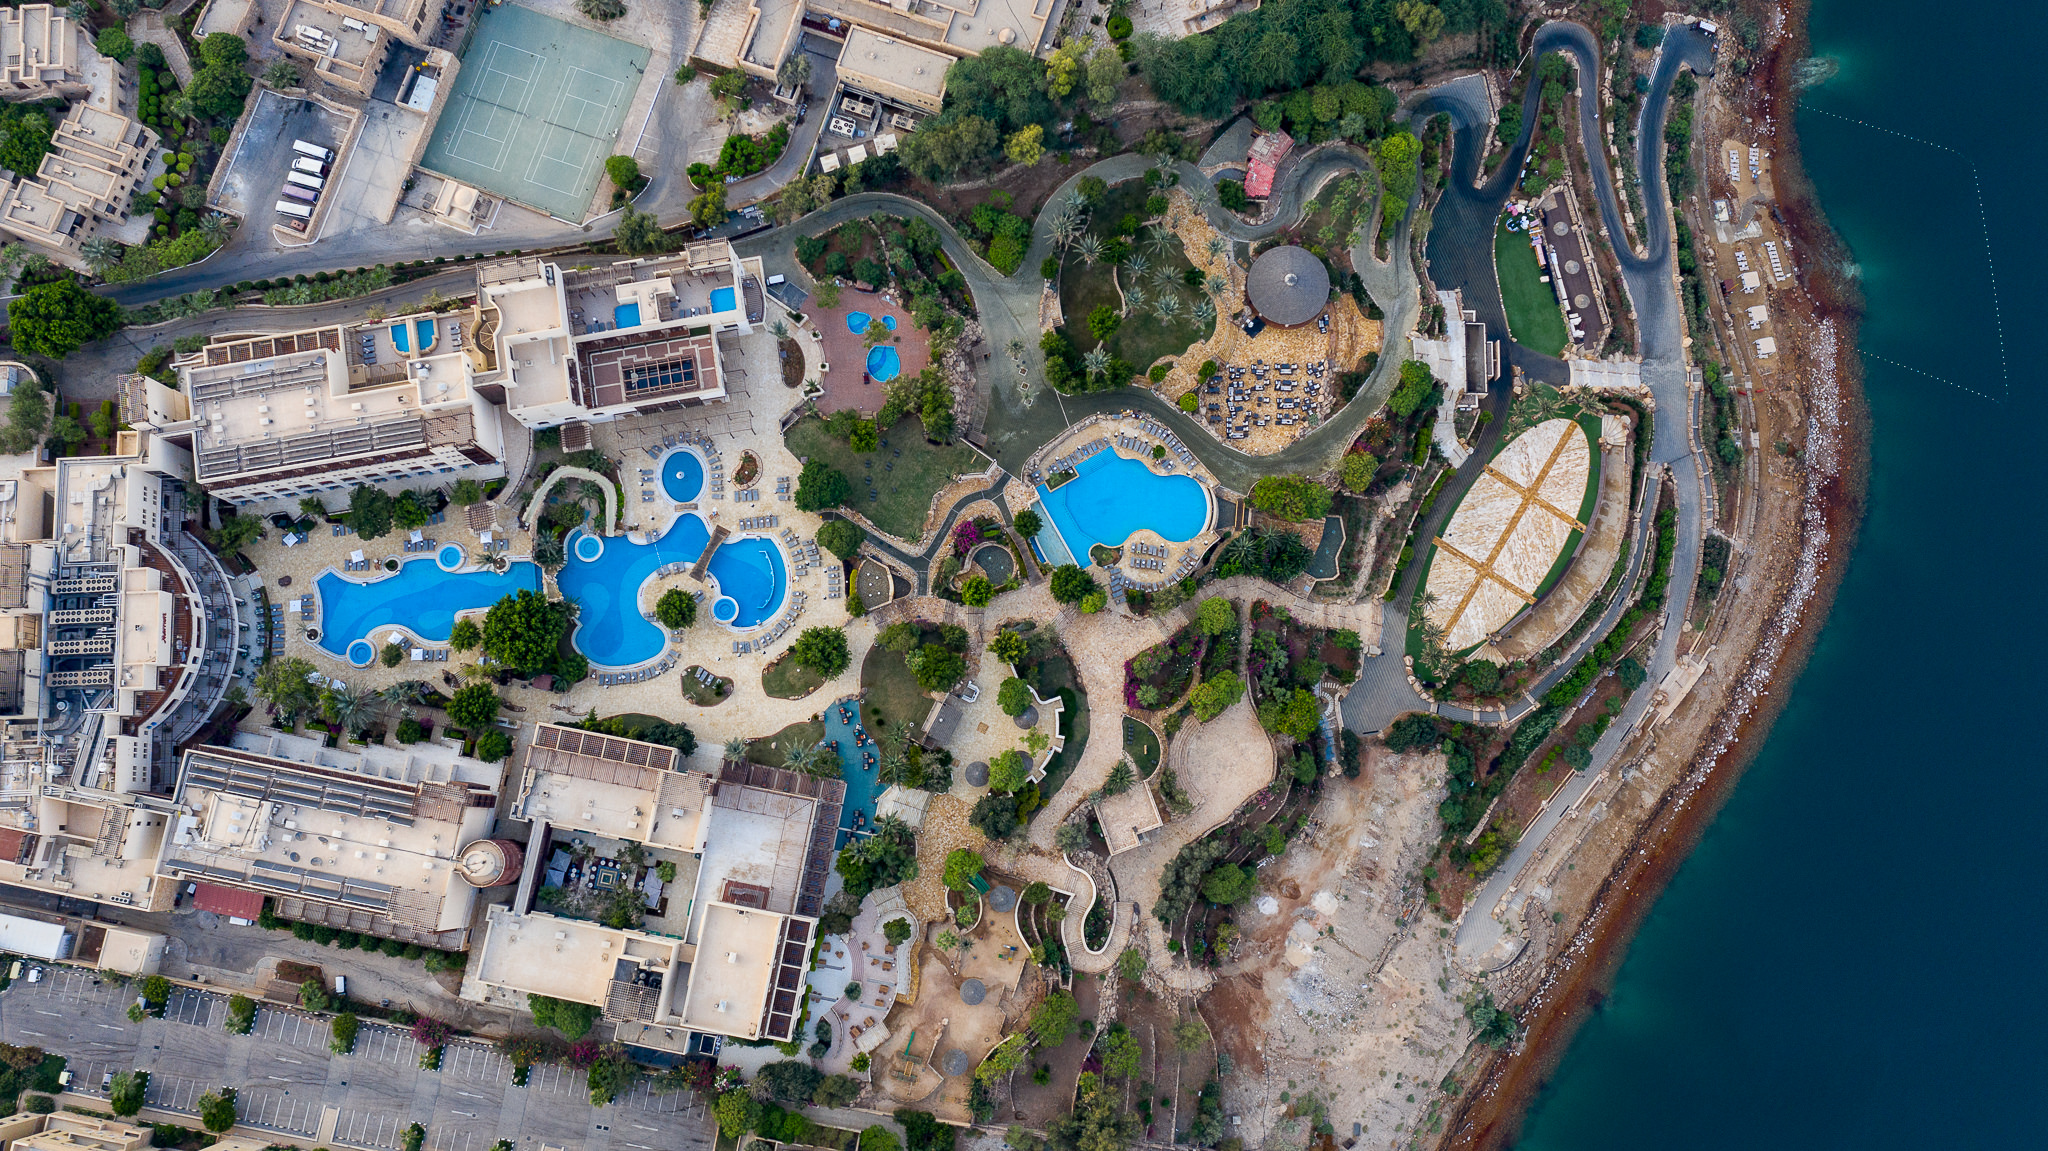
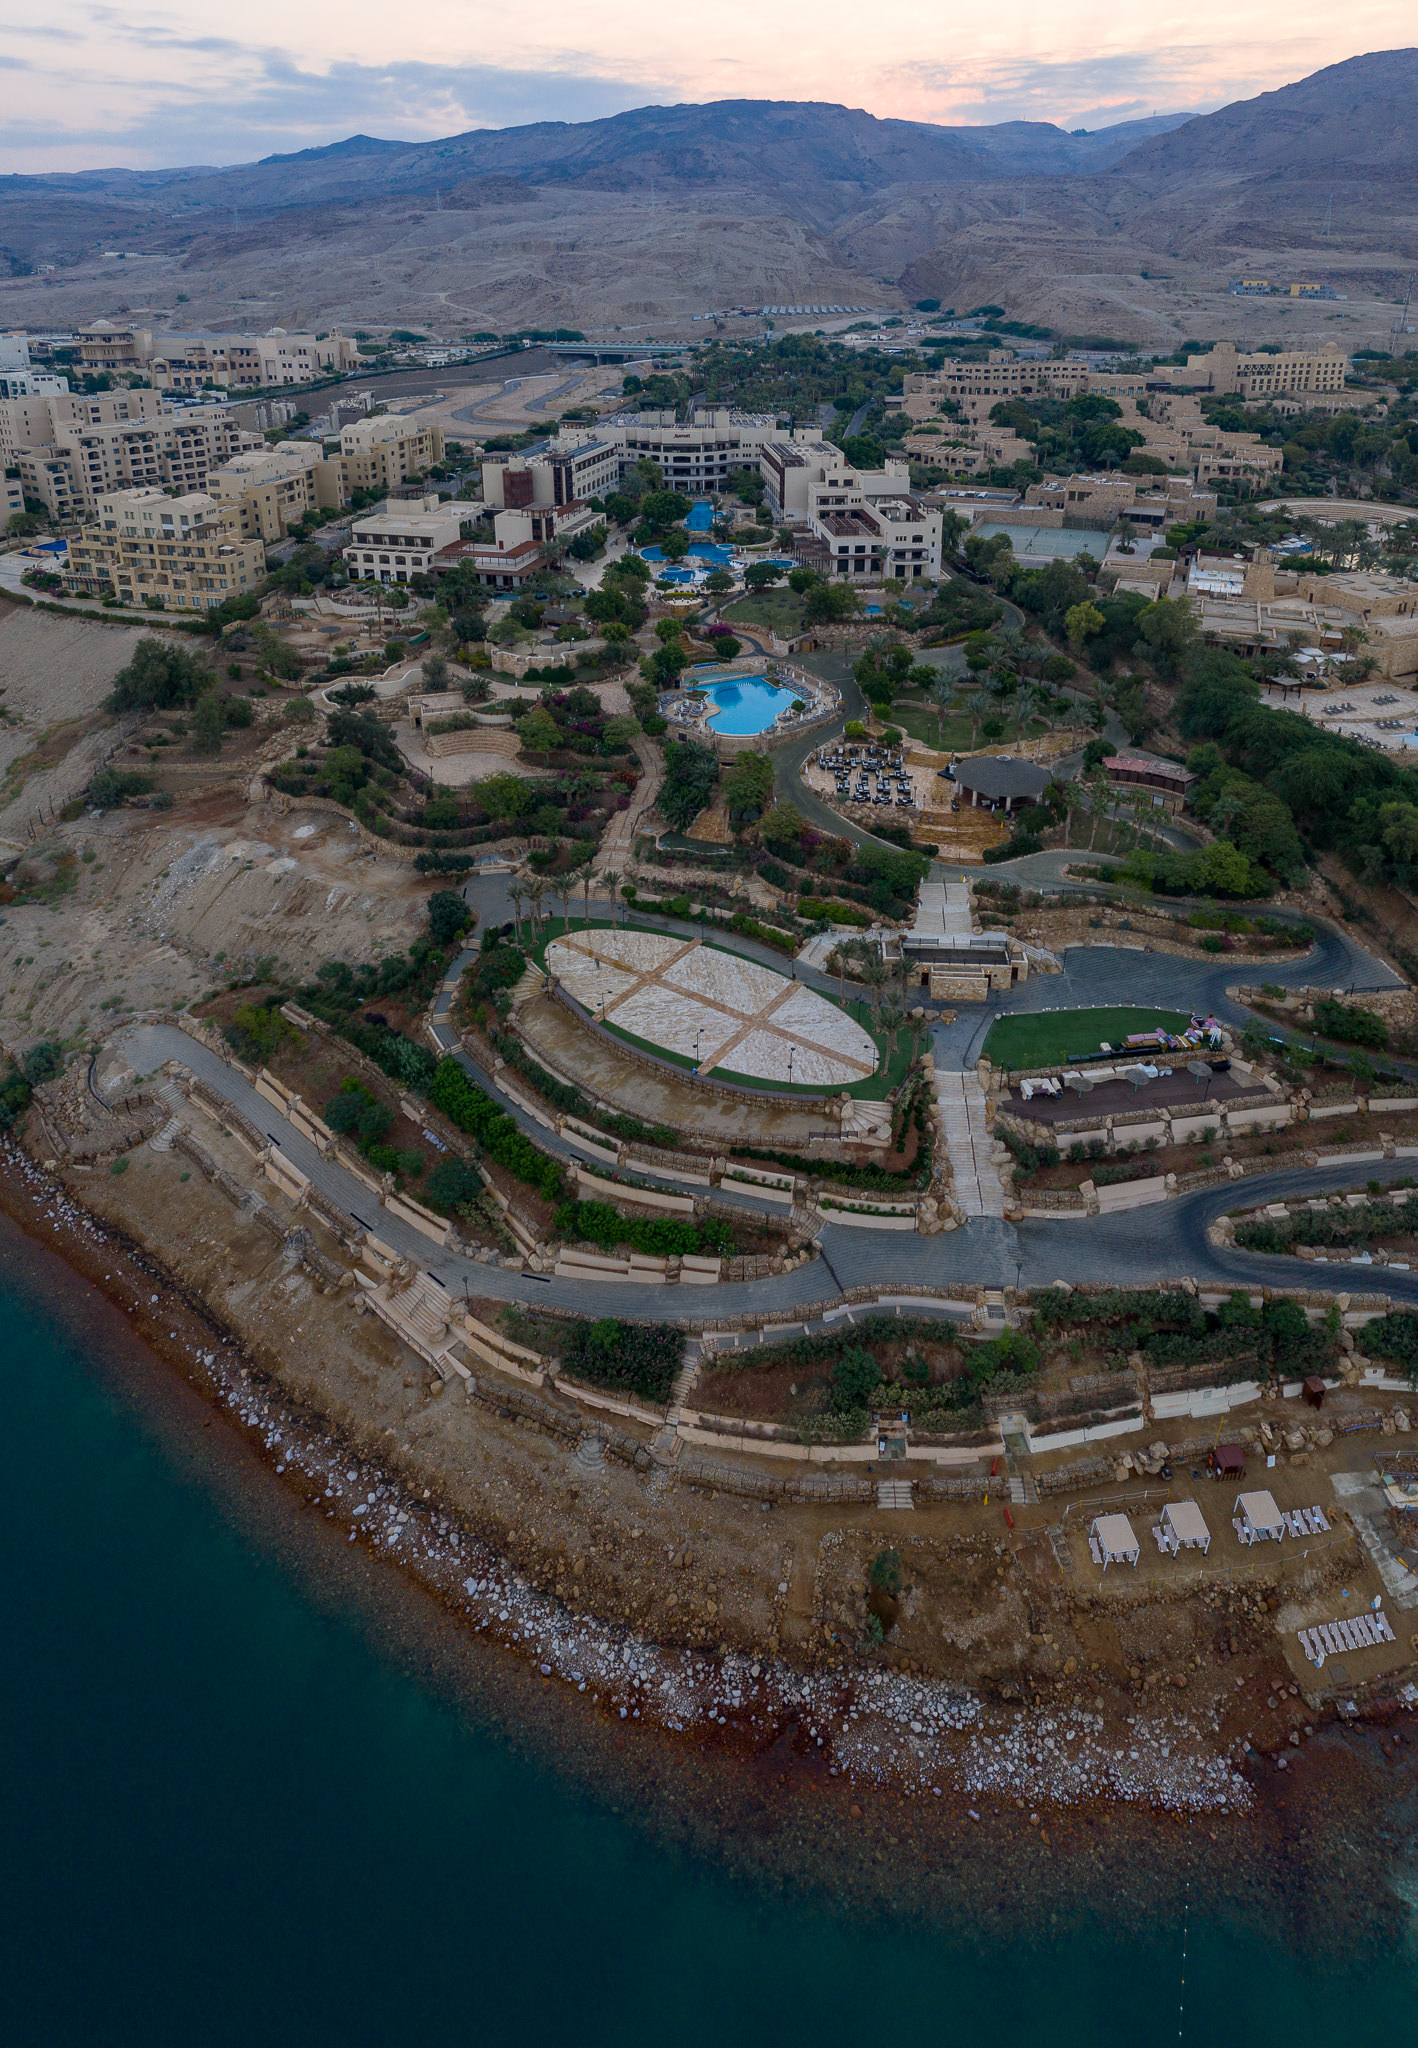
In this review of the DJI Mavic 2 Pro, we will take a closer look at how the drone performs for both aerial photography and videography. After testing out the Mavic Air last year, I realized just how useful compact drones have become for many creatives out there. Being able to photograph a scene from above gives a completely different perspective for a photographer, while videographers often rely on aerial footage to showcase a particular subject or a location. And being able to do all that with a drone that can fit in a regular camera bag is very important, especially for those of us who travel a lot. When DJI announced the Mavic 2 Pro last year with a 1″ sensor, I immediately knew that it was going to be a game-changer. So right before my trips to Jordan and Turkey last year, I decided to get this drone and give it a shot. I am very happy with my decision, as I came back with some truly unique images and video footage that I will showcase in this review.
First things first, check out this short video of Jordan that I captured using the Mavic 2 Pro, which will hopefully give you an idea of the drone’s possibilities:
While the Mavic Air is an amazing drone for someone like me who likes to pack light when traveling, I did struggle with it when shooting in low-light conditions. With its small body footprint and a tiny 1/2.3″ sensor size, the Mavic Air doesn’t do well in low-light and windy conditions. On top of that, it does have a rather limited range which only makes it ideal for capturing subjects that are close by. When using the Mavic Air, I always try to keep it in my line of sight, as it tends to lose signal once it goes beyond the several hundred feet range. In short, it is a great daylight drone that is primarily designed for shooting close subjects in good weather conditions.

However, for those of us that do landscape photography and explore nature in often extreme conditions, these limitations can be quite tough to work with. So being able to shoot aerial footage with a compact, yet stable drone that comes with a large sensor and has a long range has been a dream come true for many enthusiasts and professionals out there, including myself. As soon as I saw the Mavic 2 Pro announcement, I knew that this drone was going to be “the tool” for more serious aerial work. Equipped with a gimbal-stabilized Hasselblad camera that is capable of recording RAW images and 10-bit ungraded 4K video footage (D-Log, up to 100 Mbps video bitrate), as well as a high-quality adjustable aperture f/2.8-f/11 lens (28mm full-frame equivalent), the Mavic 2 Pro has a lot to offer for a drone that only weighs 907 grams. With its folded dimensions of 214×91×84mm, it is approximately the size of a 70-200mm f/2.8 lens, so it easily fits most standard camera bags. When it comes to pricing, the Mavic 2 Pro has an MSRP of $1,499, which is significantly more expensive than what the Mavic Air retails for at $799. However, considering the superb camera capabilities of the Mavic 2 Pro alone, it is a relatively small price to pay when you factor in the fact that large sensor drones used to cost thousands of dollars just a couple of years back.
Let’s take a look at the most important specifications of the DJI Mavic 2 Pro drone and compare them to those of the Mavic Air.
DJI Mavic 2 Pro vs DJI Mavic Air Specifications Comparison
| Drone Feature | Mavic 2 Pro | Mavic Air |
|---|---|---|
| Sensor Size and Type | 1” CMOS | 1/2.3” CMOS |
| Sensor Resolution | 20 MP (5472×3648) | 12 MP (4056×3040) |
| Sensor ISO Range | 100-6400 (video), 100-12800 (photo) | 100-3200 (video), 100-3200 (photo) |
| Video Transmission System | OcuSync 2.0 (2.4 GHz and 5.8 GHz) | Enhanced Wi-Fi |
| Maximum Speed | 72 kph (S-mode) | 68.4 kph (S – mode) |
| Max Flight Time (no wind) | 31 minutes (at a consistent 25 kph) | 21 minutes (at a consistent 25 kph) |
| Sensing System | Forward, Backward, Upward, Downward, Sides | Forward, Backward, Downward |
| Controller Max Transmission Distance | 8000m (FCC, unobstructed with zero interference) | 4000m (FCC, unobstructed with zero interference) |
| Gimbal Stabilization | 3-axis (tilt, roll, pan) | 3-axis (tilt, roll, pan) |
| Gimbal Mechanical Range | Tilt: -135°-45°, Pan: -100°-100° | Tilt: -100°-22°, Pan: -12°-12° |
| Gimbal Controllable Range | Tilt: -90°-30°, Pan: -75°-75°) | Tilt: -90°-0° (default setting), -90°-+17° (extended) |
| Shutter Speed | Electronic Shutter: 8-1/8000s | Electronic Shutter: 8-1/8000s |
| Lens | f/2.8-f/11, 28mm FF equivalent, 77° FOV | f/2.8 max aperture, 24mm equivalent, 85° FOV |
| Still Photography Modes | Single Shot, HDR, Burst Shooting (3/5 frames), AEB, Interval | Single Shot, HDR, Burst Shooting (3/5/7 frames), AEB, Interval |
| Photo Format | JPEG / DNG (RAW) | JPEG / DNG (RAW) |
| Video Format | MP4 / MOV (MPEG-4 AVC/H.264, HEVC/H.265) | MP4 / MOV (H.264 / MPEG-4 AVC) |
| Video Resolution | 4K (3840×2160 @ 24/25/30p), 2.7K (2688×1512 @ 24/25/30/48/50/60p), FHD (1920×1080 @ 24/25/30/48/50/60/120p) | 4K (3840×2160 @ 24/25/30p), 2.7K (2720×1530 @ 24/25/30/48/50/60p), FHD (1920×1080 @ 24/25/30/48/50/60/120p), HD (1280×720 @ 24/25/30/48/50/60/120p) |
| Max Video Bitrate | 100 Mbps | 100 Mbps |
| Video Color Mode | Dlog-M (10bit), Supports HDR Video (HLG 10bit) | 8-bit |
| Video Format | MP4 / MOV (MPEG-4 AVC/H.264, HEVC/H.265) | MP4 / MOV (H.264 / MPEG-4 AVC) |
| Internal Storage | 8 GB | 8 GB |
| Battery Capacity | 3850 mAh | 2375 mAh |
| Battery Weight | 297g | 140g |
| Remote Controller Battery | 3950 mAh | 2970 mAh |
| Supported Memory Cards | Up to 128 GB, microSD V30 Recommended | Up to 128 GB, microSD V30 Recommended |
| Dimensions (Folded) | 214×91×84mm (L×W×H) | 168×83×49mm (L×W×H) |
| Dimensions (Unfolded) | 322×242×84mm (L×W×H) | 168×184×64mm (L×W×H) |
| Takeoff Weight | 907g | 430g |
| MSRP Price | $1,339 (check price) | $699 (check price) |
As you can see, the DJI Mavic 2 Pro has a lot to offer when compared to the Mavic Air. The biggest features that truly matter in the field are sensor size, video transmission system / range, maximum flight time / battery life, lens quality and video features. The Mavic 2 Pro excels in all of these areas. The Mavic Air, on the other hand, offers a much smaller footprint at a twice lighter package and almost twice cheaper price. So these drones are not really directly comparable – the Mavic 2 Pro has a lot more features, which is why it has the “Pro” tag in its title.
To get an idea of the features and capabilities of the Mavic 2 Pro, take a look at the below promo video by DJI:
Build Quality and Construction
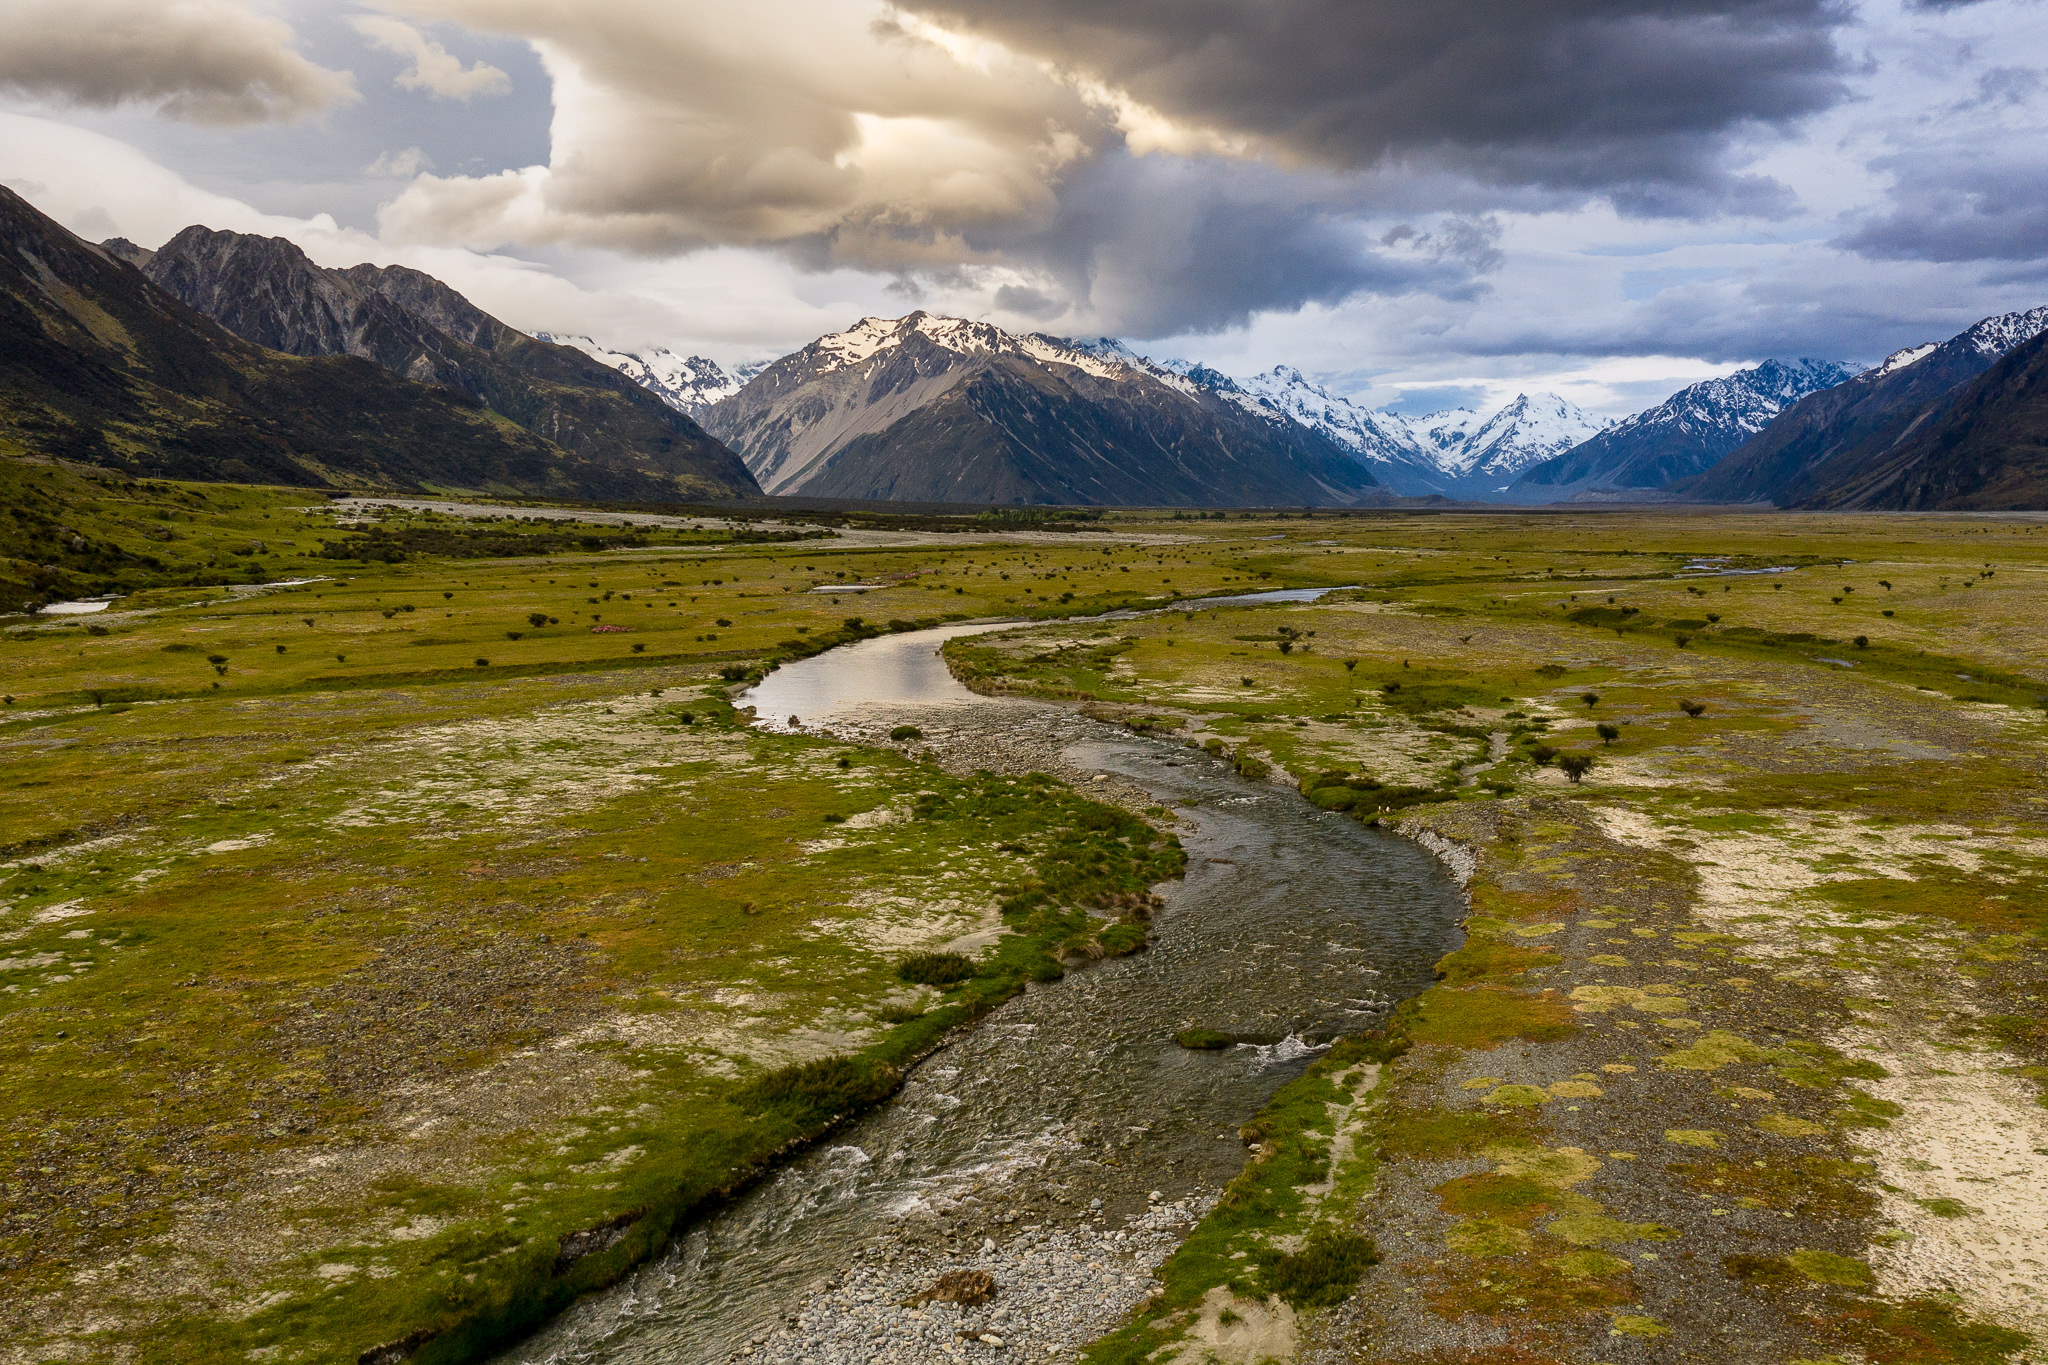
As expected from DJI, the build quality of the Mavic 2 Pro is excellent. So far I have put it to use in harsh desert conditions of Jordan, cold parts of Turkey and rainy conditions of New Zealand and the drone survived it all without any issues. Thanks to all the sensors on the drone, I have not been able to crash the drone even once, but if I did, I am sure the damage would highly depend on the impact speed and the height of the fall. Both the controller and the drone feel like they have been made to last, with high quality and yet lightweight plastic construction.
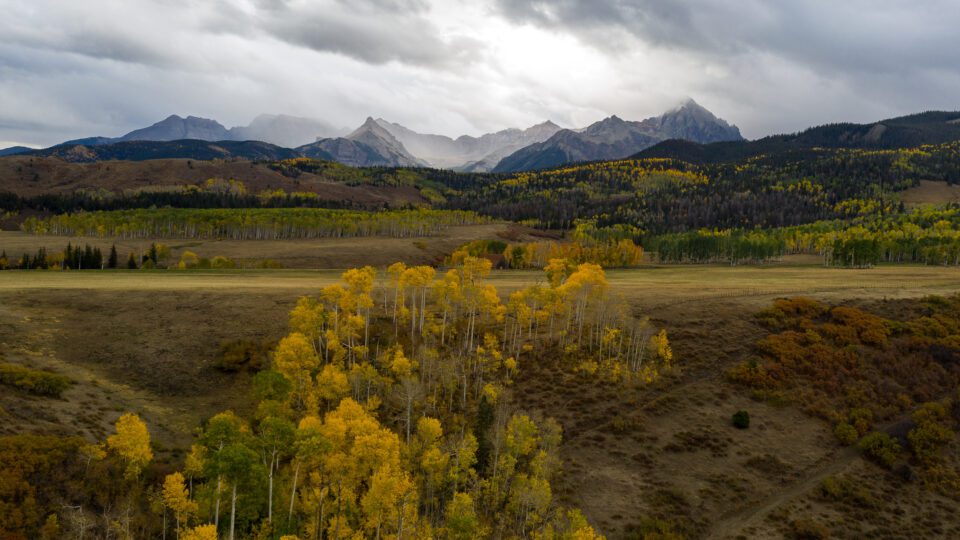
L1D-20c + 28mm f/2.8 @ 10.26mm, ISO 100, 1/160, f/4.0
When it comes to the controller, the one made for the Mavic 2 Pro is much nicer compared to the one for Mavic Air. While operating the joysticks is easy on both, the Mavic 2 Pro controller has a nice display that shows all the messages and warnings, which is great. Since the release of the drone, DJI released an even better “Smart Controller” that has a built-in display. I am not sure I would buy it at its steep $649 price, but it looks like it would be a good option for those who do not want to bother having to connect their smartphone to the controller to operate it. It is specifically designed to be used outdoors with its 1000 cd/m2 LCD screen, long-lasting battery and ability to operate at extreme temperatures, and has a bunch of built-in features such as the ability to share videos and record livestreams.
Unlike the Mavic Air, the Mavic 2 Pro standard package does not come with a nice carrying case. However, everything else that is needed to start flying the drone (as well as extra propellers) is included in the retail box. The charger designed for the Mavic 2 Pro comes with a single extra USB slot, but there is also a detachable micro USB cable that you can use to charge up the controller. So in essence, you are not losing anything compared to the Mavic Air and actually even gaining the convenience of having the charging cable integrated into the charger. The Mavic 2 Pro only comes in gray color, so you cannot choose between different colors like you can with the cheaper drones.
Mavic 2 “Fly More Kit”
If you decide to get the Mavic 2 Pro or any of its variants like “Zoom” or “Enterprise”, my recommendation would be to spend another $325 to get the “Fly More Kit“, which includes two extra batteries (so that you will have a total of three), a car charger, a charging hub that allows charging up to four batteries sequentially, a battery to power bank adapter, 2x extra pair of propellers and a shoulder bag. Considering that the battery by itself retails for $128, you are getting quite a bit of stuff for 70 bucks.
The charging hub is a must-have accessory if you are planning to use the drone. While it is nice to be able to fly the drone for thirty minutes, the reality is that you do not want to push the drone battery that long, especially when flying in very cold or very hot temperatures. So for that most part, you can expect to fly the drone up to 20-25 minutes on a single charge maybe, in order to have enough time to fly it back and safely land. This means that you will be going through batteries rather quickly and being able to have 3-4 fully charged batteries is going to be essential when traveling. I personally have a hard time with swapping batteries at night and I would much rather just hook everything up before going to sleep and wake up with all batteries fully charged. And that’s exactly what the charging hub is for.
Another cool accessory that is part of the “Fly More Kit”, is the battery to power bank adapter. This little accessory will allow you to convert any of the drone batteries to a power bank, so that if you end up with a dead battery on your smartphone, you can simply hook it up to the battery and get your device charged up. This is a great gadget to have for a traveler, because you no longer will need to carry a separate power bank! I am happy to lose as much weight as possible off my camera bag, so this is definitely an accessory I wouldn’t want to forget at home.
Mavic 2 Pro Controller and Transmission Signal
DJI did a great job by keeping the footprint of the Mavic 2 Pro relatively small. This not only applies to the drone itself, but also to its accessories and the controller. While the controller is definitely larger and bulkier compared to the one on the Mavic Air, keep in mind that it is functionally much more capable in comparison.
First of all, the Mavic 2 Pro controller uses DJI’s Ocusync 2.0 technology that allows transmission of signal up to 8000 meters with a clear sight of the drone, which is twice the theoretical limit of the WiFi controller on the Mavic Air. In real life environment, however, the range differences between the two are pretty drastic. When shooting in Jordan, we often had two drones in the air at the same time – the Mavic Air and the Mavic 2 Pro. The operator behind the Mavic Air got frustrated on a number of occasions, where the drone would lose signal at relatively close ranges, while the Mavic 2 Pro kept on going without any issues. If you review the footage of the Jordan video one more time, you will see panning shots of Wadi Rum landscapes that I did at long 3-4+ kilometer distances. I think the longest range I flew with the drone was the canyon scene, where I flew the drone until the footage on my screen got very blurry and I decided to pull back. My primary concern at the time wasn’t really the range, but rather the battery life of the drone for the return trip. I can’t remember the exact distance before I pulled back, but it was certainly far enough to push the limit of the drone transmission signal.
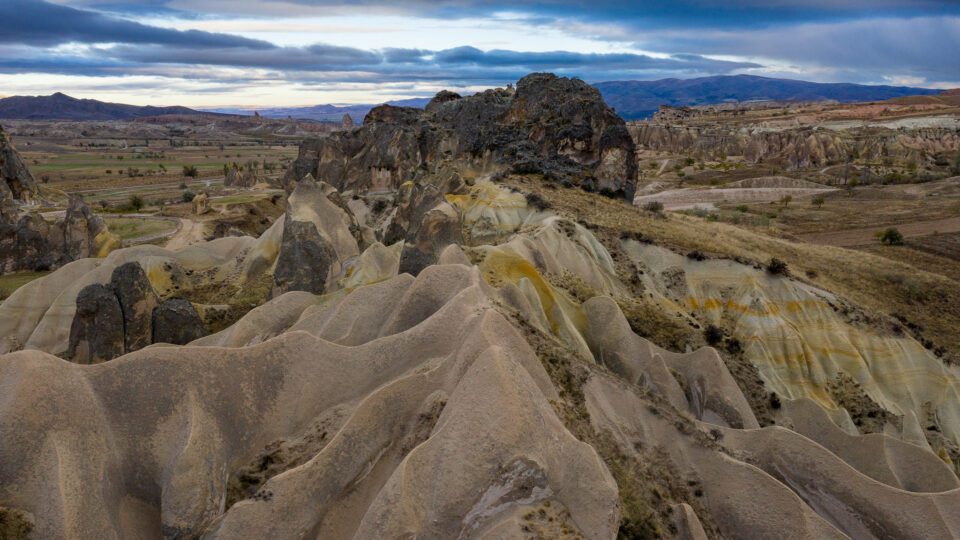
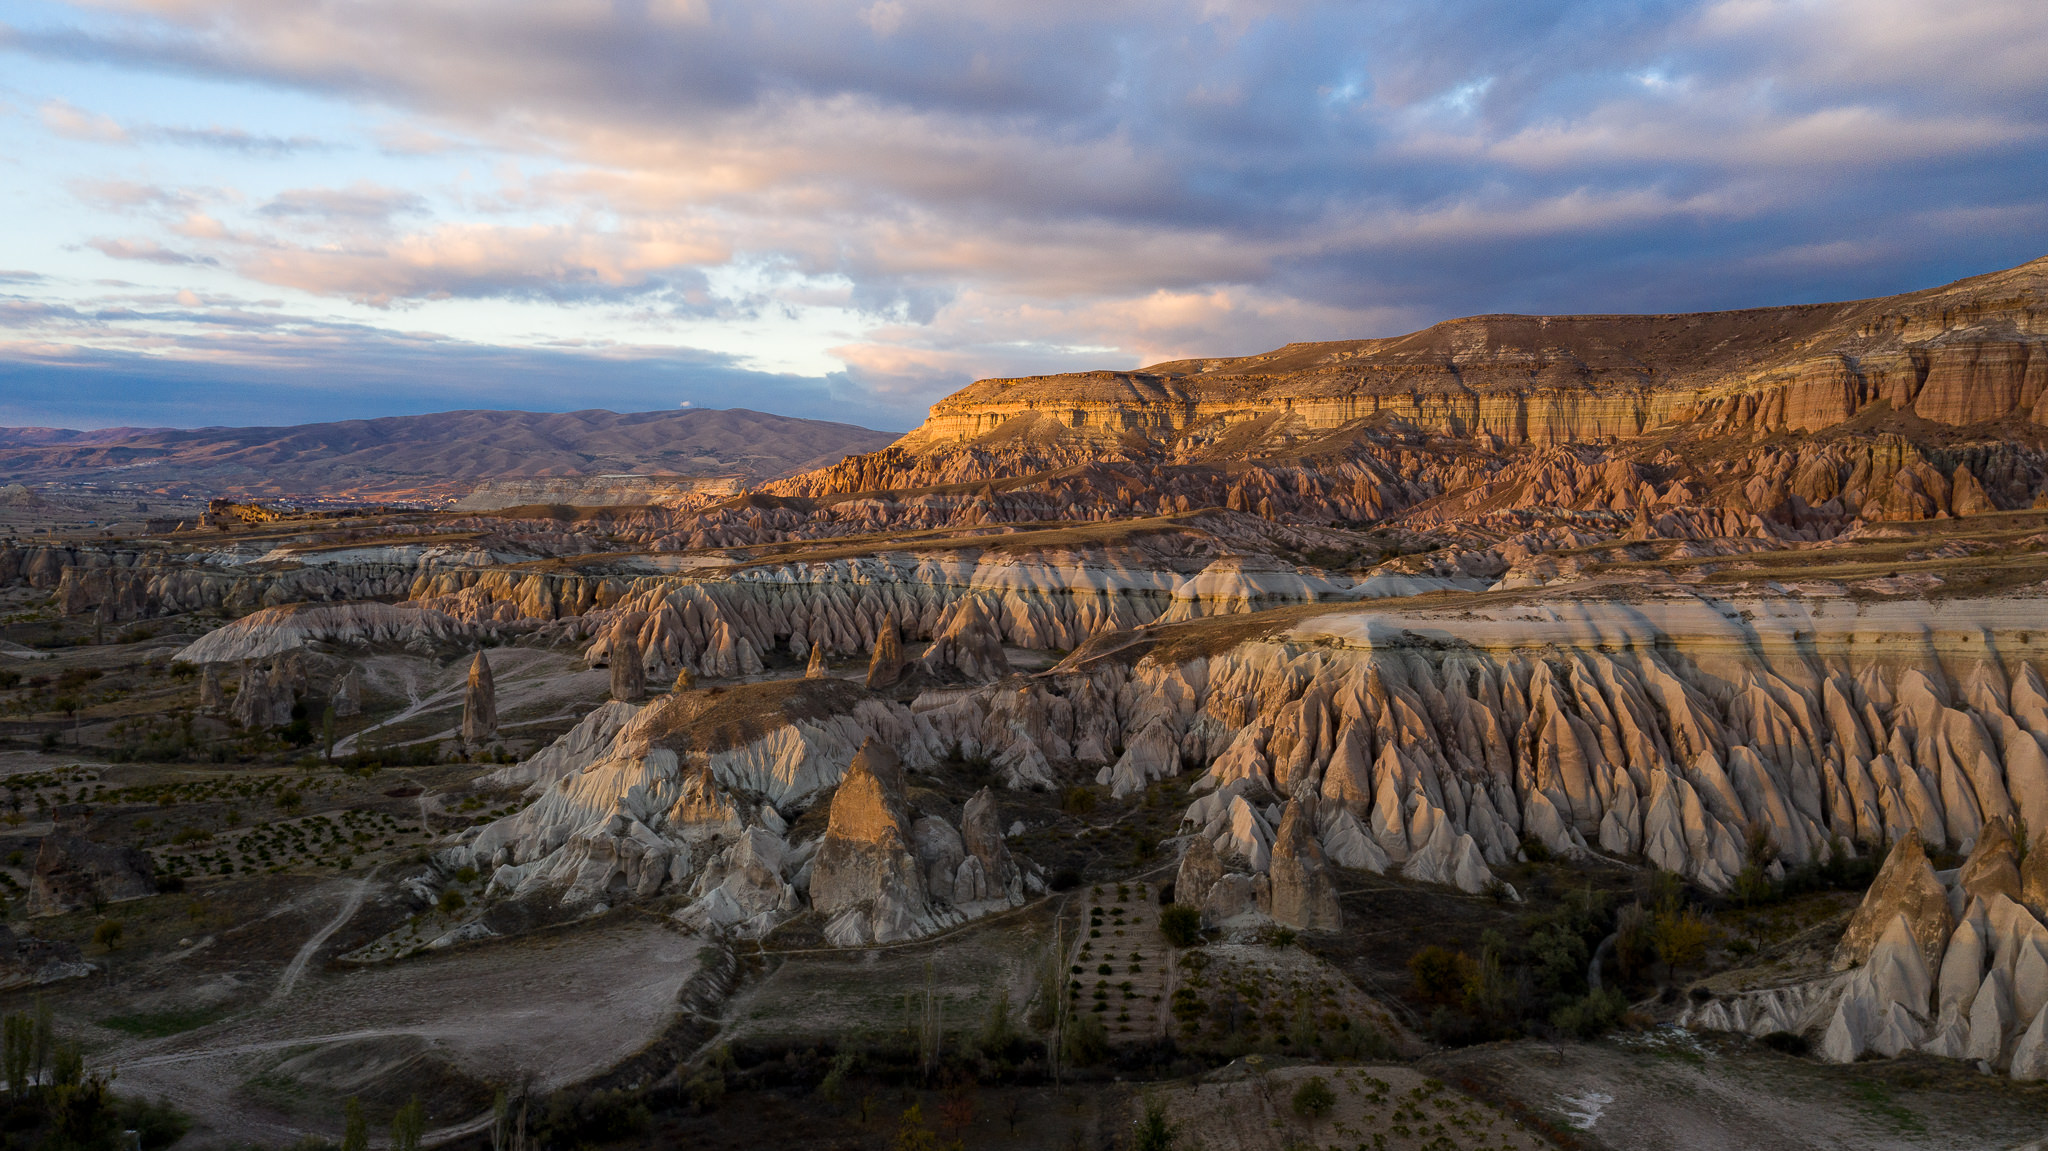
Keep in mind that the range highly depends on the overall visibility of the drone. When I shot a scene in Capaddocia (Turkey), there was a point at which the drone flew over a small hill and then under, and since I didn’t have direct line of sight of the drone, the signal went very weak and I started losing the video feed. The distance between myself and the drone was definitely under a kilometer when this happened. So just keep this in mind when operating a drone – the ideal situation always calls for a good line of sight.
Operating the drone with the controller is super easy. To set it up, all you have to do is open up the radio antennas, open up the two compartments on the bottom, pull out the two joysticks and screw them on, then attach the right cable to your phone. All this can be done in less than 30 seconds.
To turn on the drone, you press the battery button once, then you press it again and hold it. The controlled is powered the same way. Once both are on, you wait for the controller to sync up with the Mavic 2 Pro, which can take a minute. After the controller is synced, the red light on the controller will turn green, as it does with other DJI drones. From there, you have to launch the DJI GO 4 app on your device to start controlling the unit.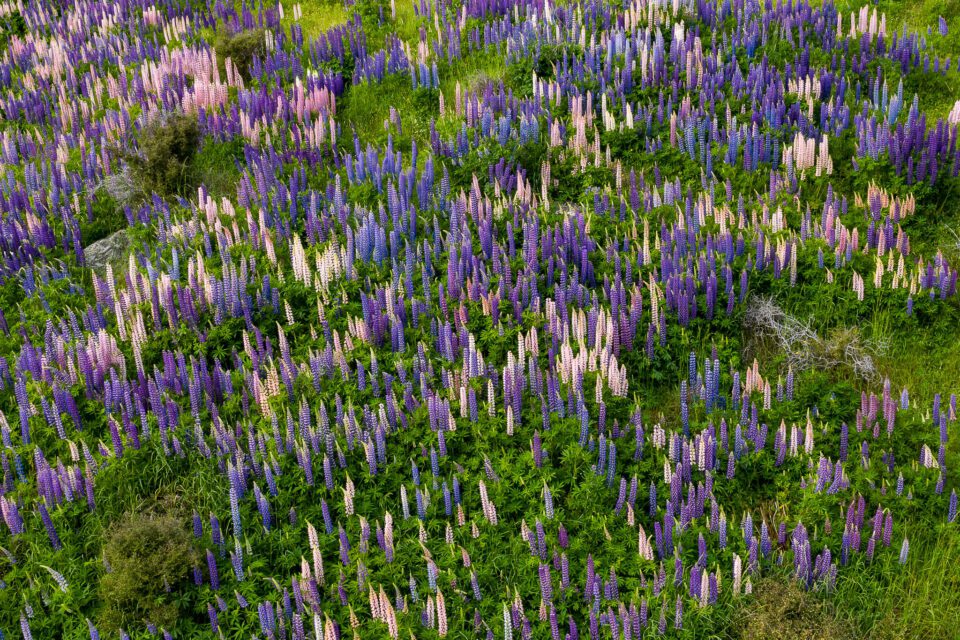
DJI GO 4 App
To fly the drone, I used my iPhone, which fit on the unit without much effort. The DJI GO 4 App worked very well and I did not experience any serious glitches. When using the drone for the first time, the app prompted to update the firmware. I went through the process and it completed without any issues for both the drone and the controller. Every once in a while, I was also prompted to perform the “Precise Fly Safe Database Update”, especially when moving from one region to another. After that, the aircraft was basically ready to go.
When moving from one location to another, I often had to re-calibrate the drone before flying, which only took about 10-15 seconds. The calibration process is very easy – all you to do is rotate the drone horizontally, then vertically, as shown in the screenshot below:
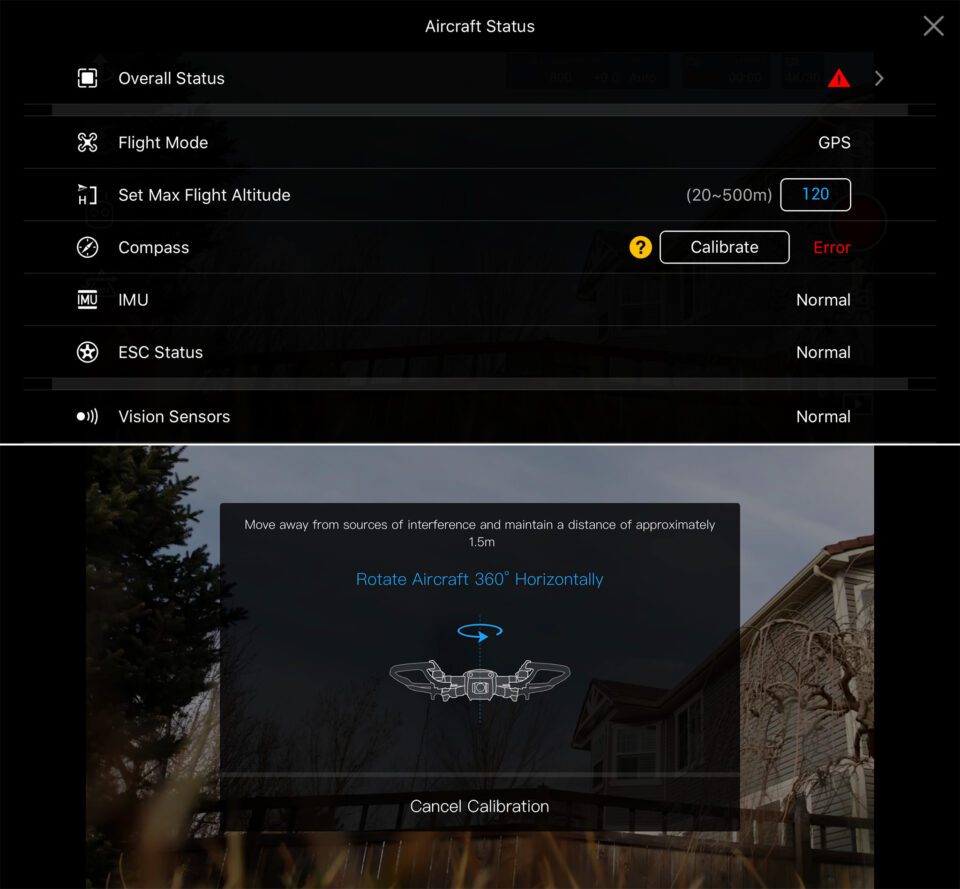
You might want to wait a few more seconds for the GPS to get ready, so that it knows where the exact takeoff point is, in case the drone starts to get lost and needs to get back. Taking off is very easy. All you have to do is touch the take off icon on the top left corner and the screen will ask if you want to record the precise location of the take-off point, so that it can return there after the flight. You make the selection and proceed, after which the drone will fire up its propellers and take off.
Flying the Drone
Although I have previously operated the DJI Phantom 3 and the Mavic Air drones, I still consider myself to be a rookie drone operator – I still have a lot to learn for sure. You could probably put me in the category right above the beginner level. Still, despite my lack of experience operating drones, I was able to fly the Mavic 2 Pro without much effort. In fact, the overall experience was similar to flying the Mavic Air in terms of how easy it was to move it around and perform basic functions, such as taking pictures and capturing video. I obviously managed to make some mistakes while operating the drone (those who are very good at this will see those mistakes in the video). Often times, I was too focused on flying the drone and would forget to change my exposure and other settings. Oh well, live and learn! Still, despite all these issues, I came back with some beautiful footage that I can use for my portfolio, as well as to promote my workshops in the future. And for me, that’s what really matters at the end of the day.
The DJI GO 4 app is pretty versatile and there are many features, some of which I will go through below. Aside from being able to see what the drone sees, or is going to record / take pictures of, you have plenty of other useful information. You can see the altitude, the speed and other relevant data, which is very useful to know in the field. If there is wind that is shaking up the drone, you will get wind warnings. And if you are flying in a limited zone, you will be warned. DJI manages zones quite well and if you attempt to fly in prohibited areas (close to airports, etc), the app might not even allow you to fly the drone. This is good, because it prevents people from being able to launch drones in places where they shouldn’t be allowed to fly them. Unfortunately, some select individuals do quite a bit of harm using drones in ways they shouldn’t, spoiling it for the rest of us. So please, fly responsibly!
DJI GO 4 App Settings
The DJI GO 4 App has a lot of options to choose from, which might make it look complex, especially for those who are just starting out. Don’t worry, you don’t need to know all those settings – in fact, the drone will fly with the default settings just fine and you only need to change settings when you are ready. To access the main settings menu, press the three dots on the right side of the screen and you will be presented with a menu like this:
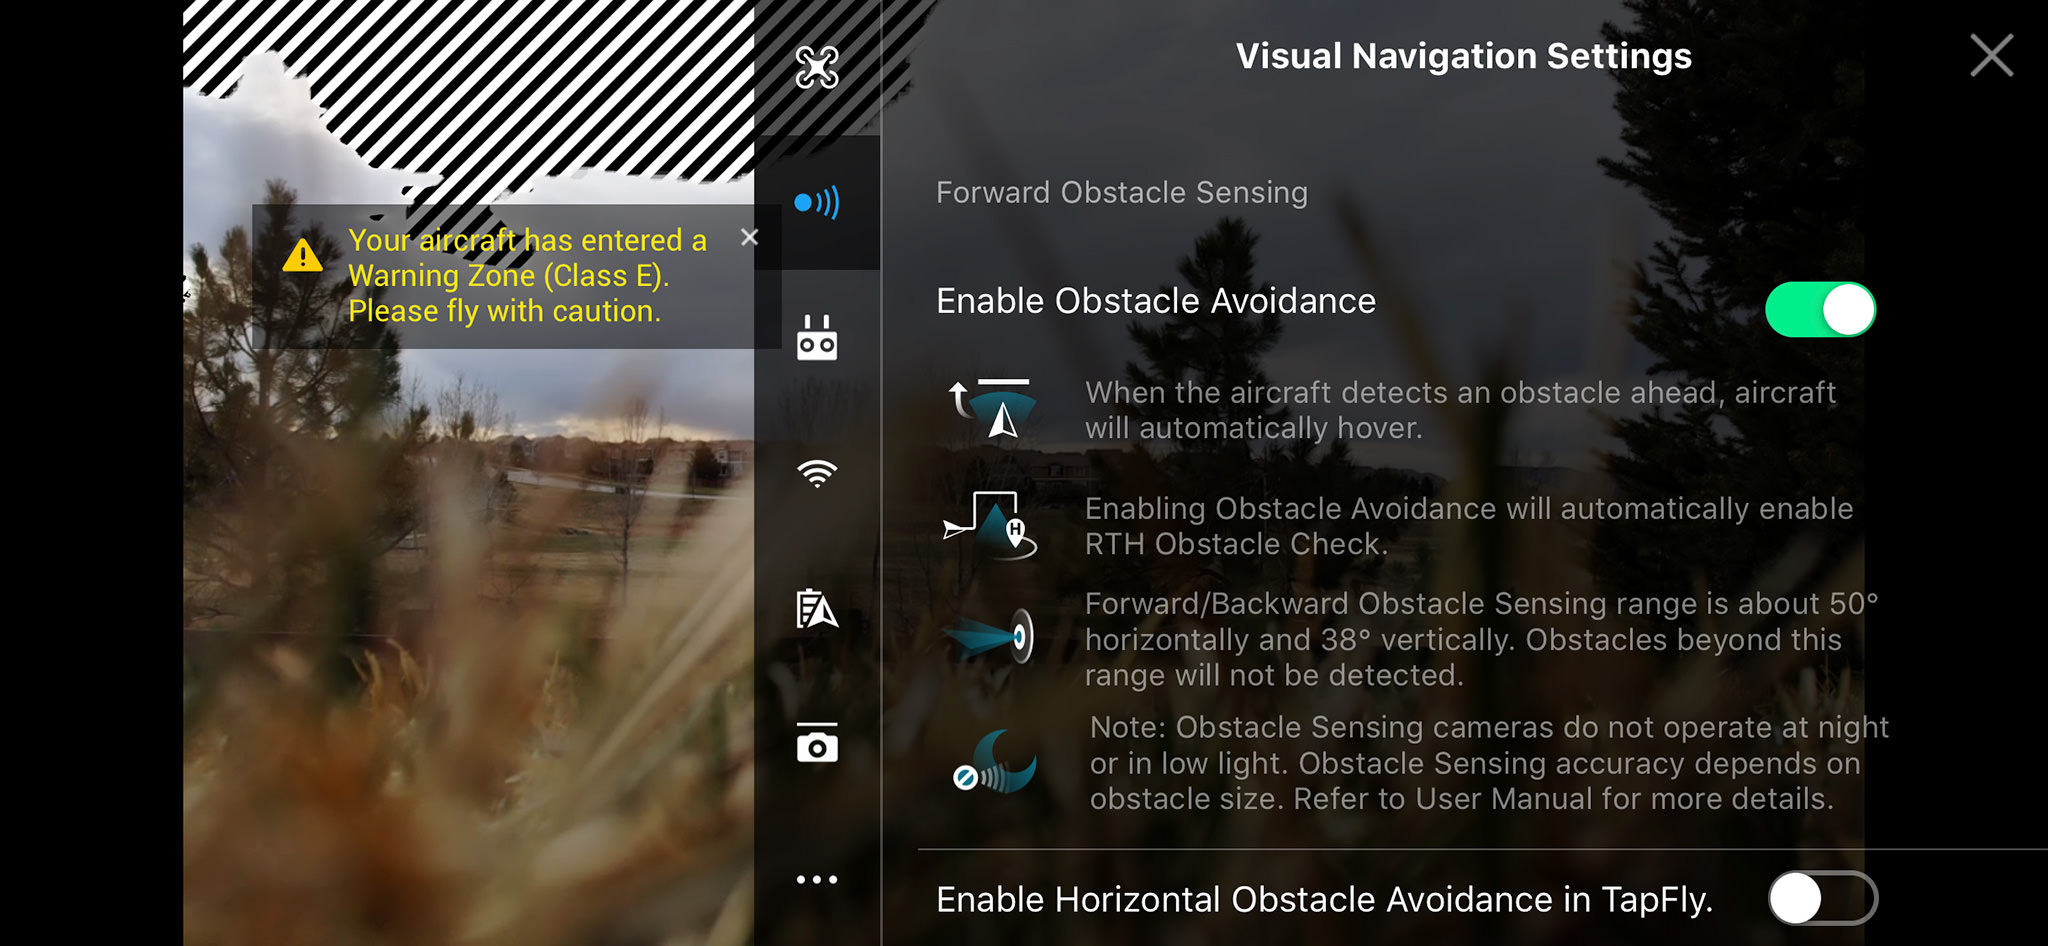
I would recommend to keep most of the settings at their default values, but feel free to check these settings out and experiment after you are more comfortable with flying. In some situations, you might need to disable some of the functions, or perform specific tasks, such as controller calibration and button customization.
Battery Life
The battery life on the DJI Mavic 2 Pro is noticeably better when compared to the Mavic Air. That’s a given, considering how big the batteries on the Mavic 2 Pro are in comparison. With a total capacity of 3850 mAh, the Mavic 2 Pro can fly up to 31 minutes, while the Mavic Air is limited to 21 minutes with its 2375 mAh battery. Those 10 minutes of difference do matter when flying over long distances.
When using the drone in Jordan, Turkey and New Zealand, I only had two batteries with me at a time. Considering that I used the drone at most once a day, it was plenty enough for my needs. After-all, I mostly took pictures with my regular full-frame camera and only used the drone when I was basically done or the conditions for shooting weren’t ideal. However, if I were to do it more seriously, I would certainly want to take 3-4 batteries with me, especially when dealing with limited charging time / conditions.
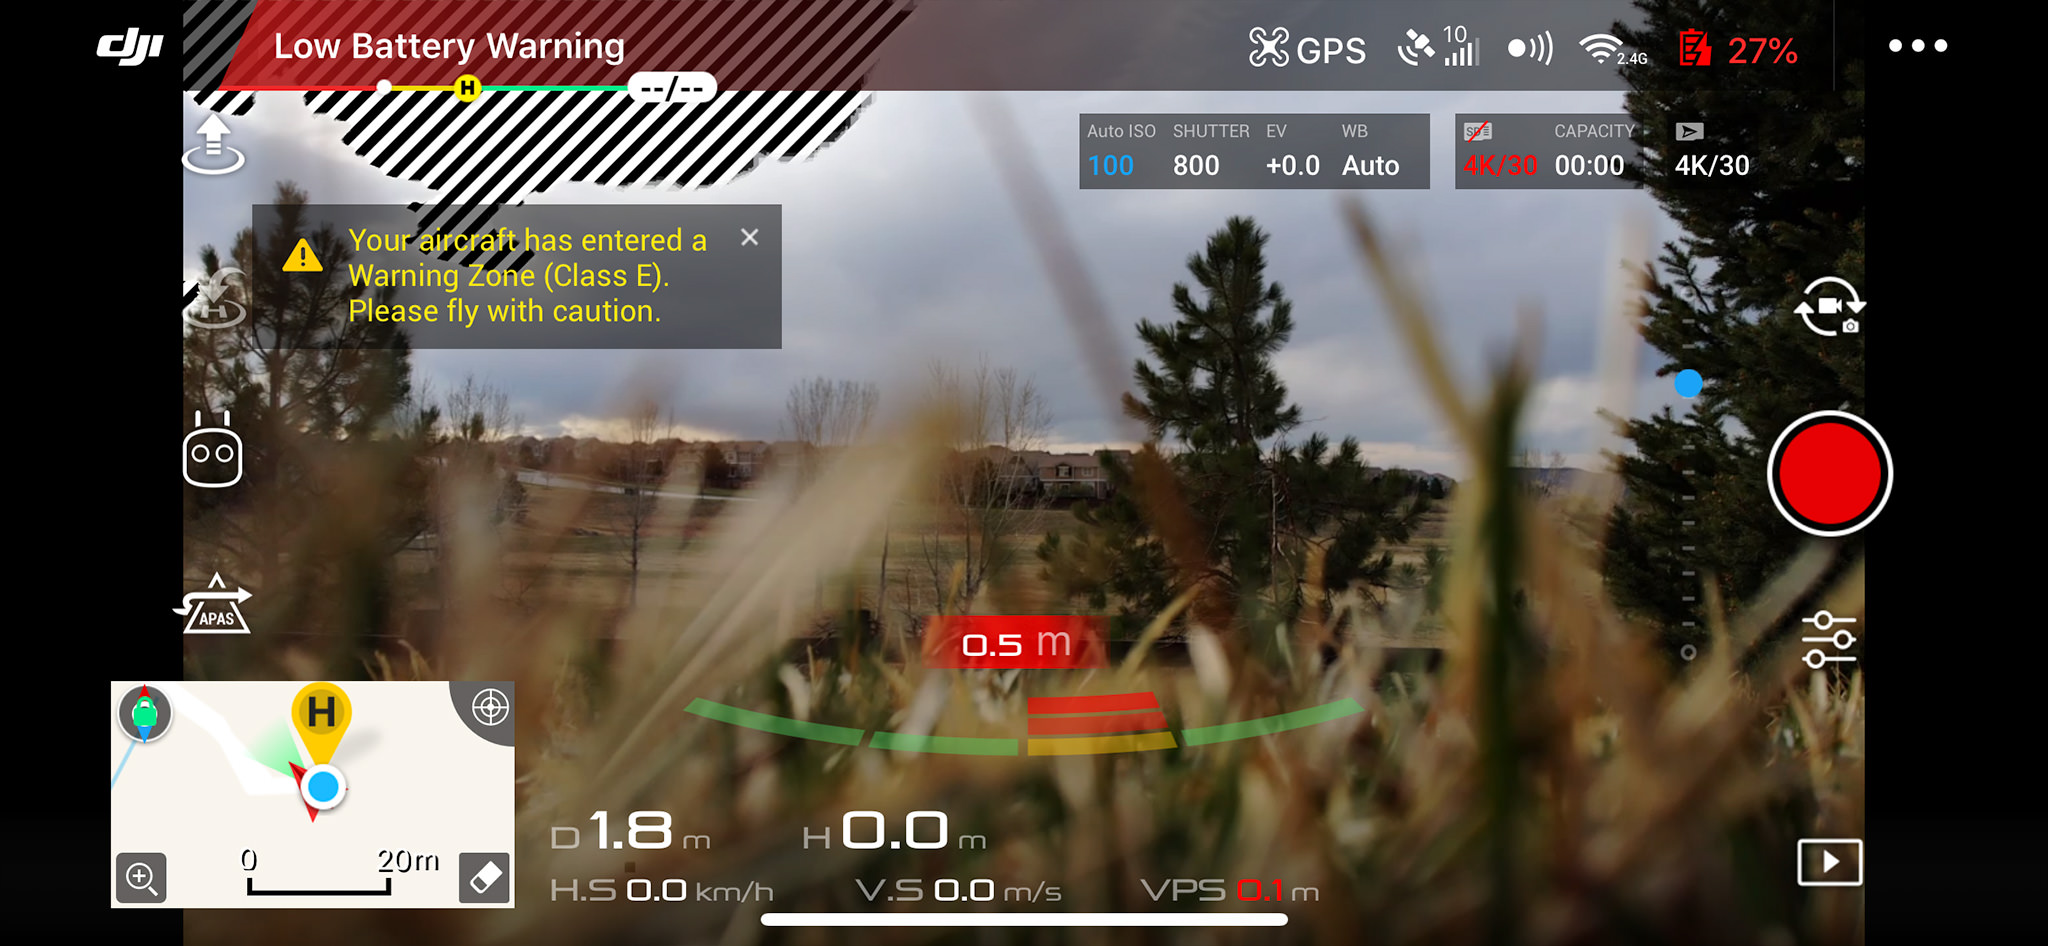
When flying the drone, it is easy to lose track of time, since you are always too busy looking at the screen, especially while taking images and video. Thankfully, the DJI GO 4 App automatically calculates how long it will take to fly back and land the drone, so if you are getting dangerously close to draining the battery, the app will give you a “Low Battery Warning”, similar to the one below:
Landing the Mavic 2 Pro is very easy. You can either use the landing icon on the app, or use the joystick to land manually. Make sure that the spot you are planning to land on is even and clean, or you risk damaging the drone rotors. The sensors on the Mavic 2 Pro work very well for easy and safe landings, but you should be careful when trying to grab the drone in mid-air – unlike the Phantom-series, there is little room to grab the drone and you certainly do not want to put your fingers between those blades! If you just grab the drone in mid air, it will think of the grabbing force as air and will spin up its rotors to the maximum to balance it out, at which point it will be very difficult to keep holding it. I didn’t realize how powerful these things are until I tried it out! So unless you know what you are doing, I would just recommend to land the drone on the ground to keep it safe.
Keep in mind that you also have to charge the battery inside the controller. It will take about three hours to fully charge the controller and once it is charged, it will be good to go for a few hours. I often found myself charging the controller every other day and even then, I still had quite a bit of battery life left in it.

Video Settings
By default, the drone will be set to record video, which you can record either into the built-in 8 GB memory, or into a separate microSD card. While it is nice to have some built-in memory, I would strongly recommend to get a fast microSD card (V30 or faster preferred) that won’t boggle down when you write 4K video into it. I used a 128 GB SanDisk Extreme Pro microSD card, which was pricey, but capable of very fast throughput. Even though the Mavic 2 Pro does not support the speeds of UHS-II cards (the memory card slot is UHS-I only), it had no problem writing to it and I was happy with the very fast transfer rates I was getting from the memory card to my computer.
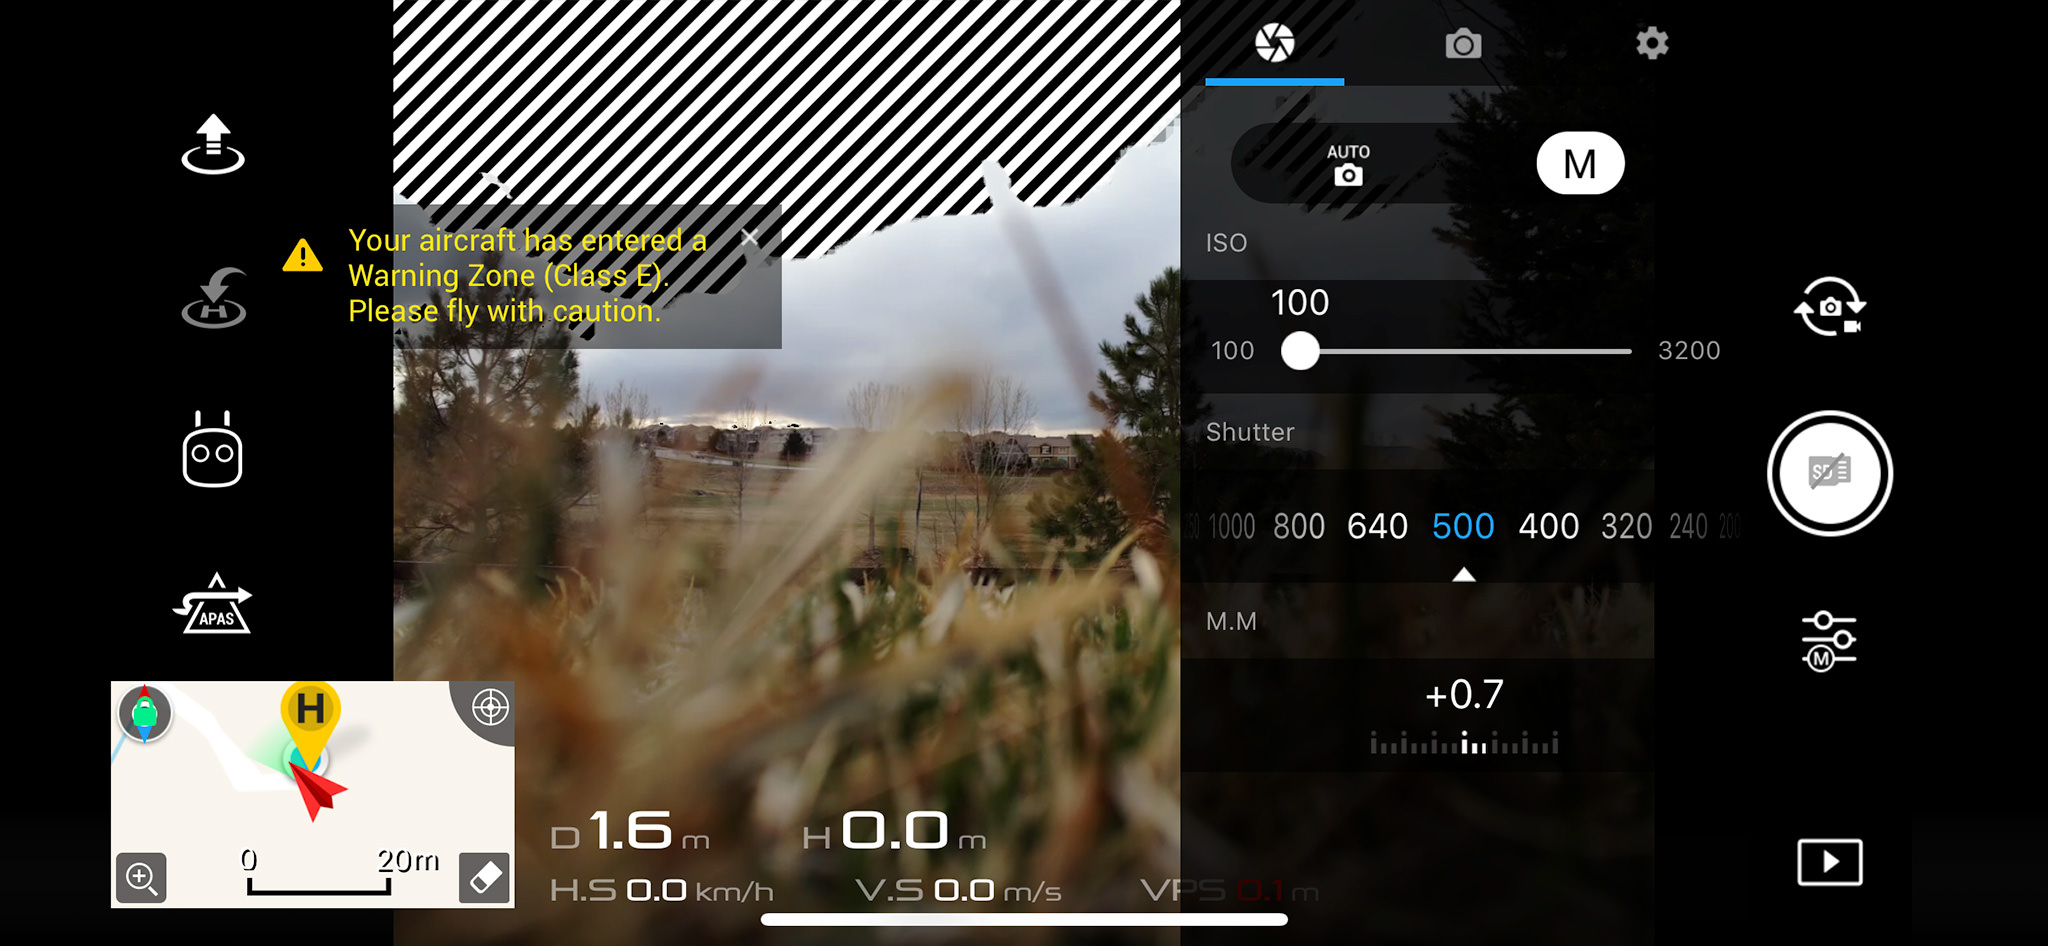
The video settings can be accessed by pressing the icon with three sliders on it. The “aperture” tab will have the basic camera settings for shooting video, such as camera mode, ISO, shutter speed and exposure compensation:
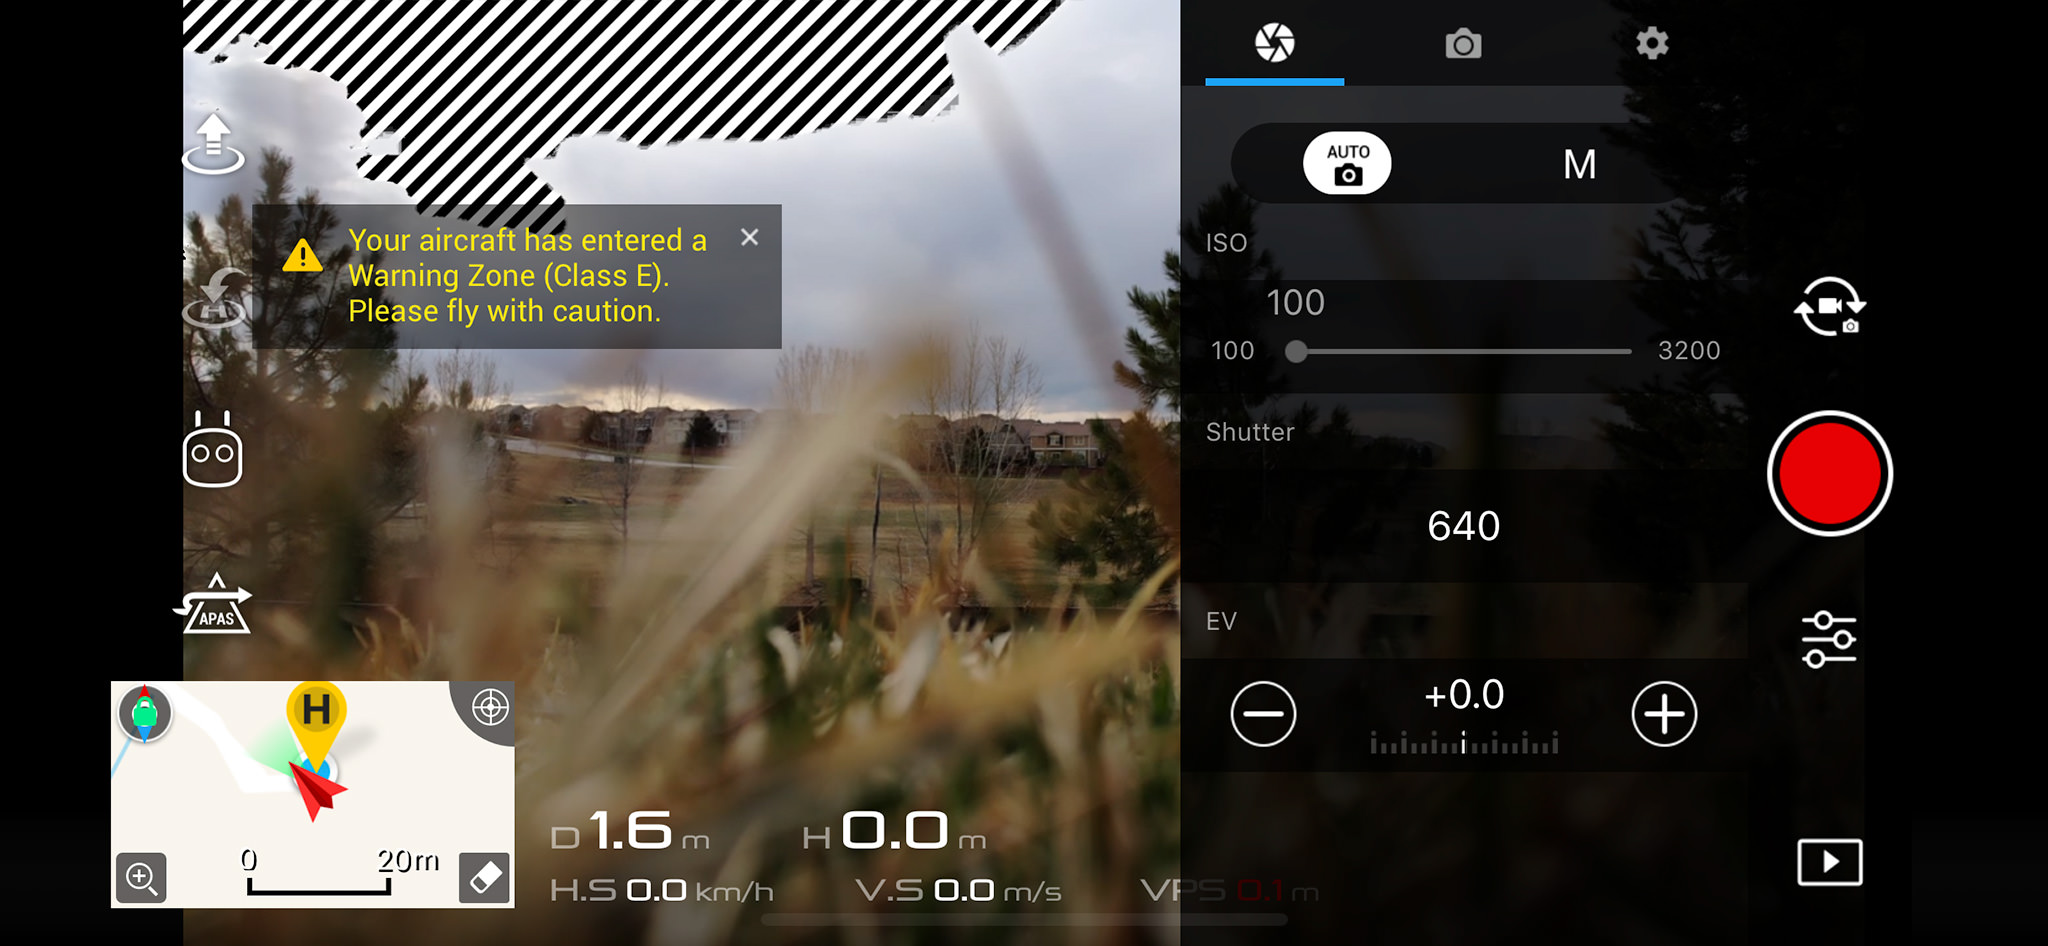
While the drone does a good job at properly exposing video, I have seen a number of cases where the drone would slowly change exposure, resulting in inconsistently exposed videos (and I have certainly made a number of mistakes when using the drone in Aperture Priority mode). For this reason, I would recommend to switch to manual mode before you start recording – just make sure to adjust your settings accordingly depending on what you are shooting and the type of ambient light you are dealing with.
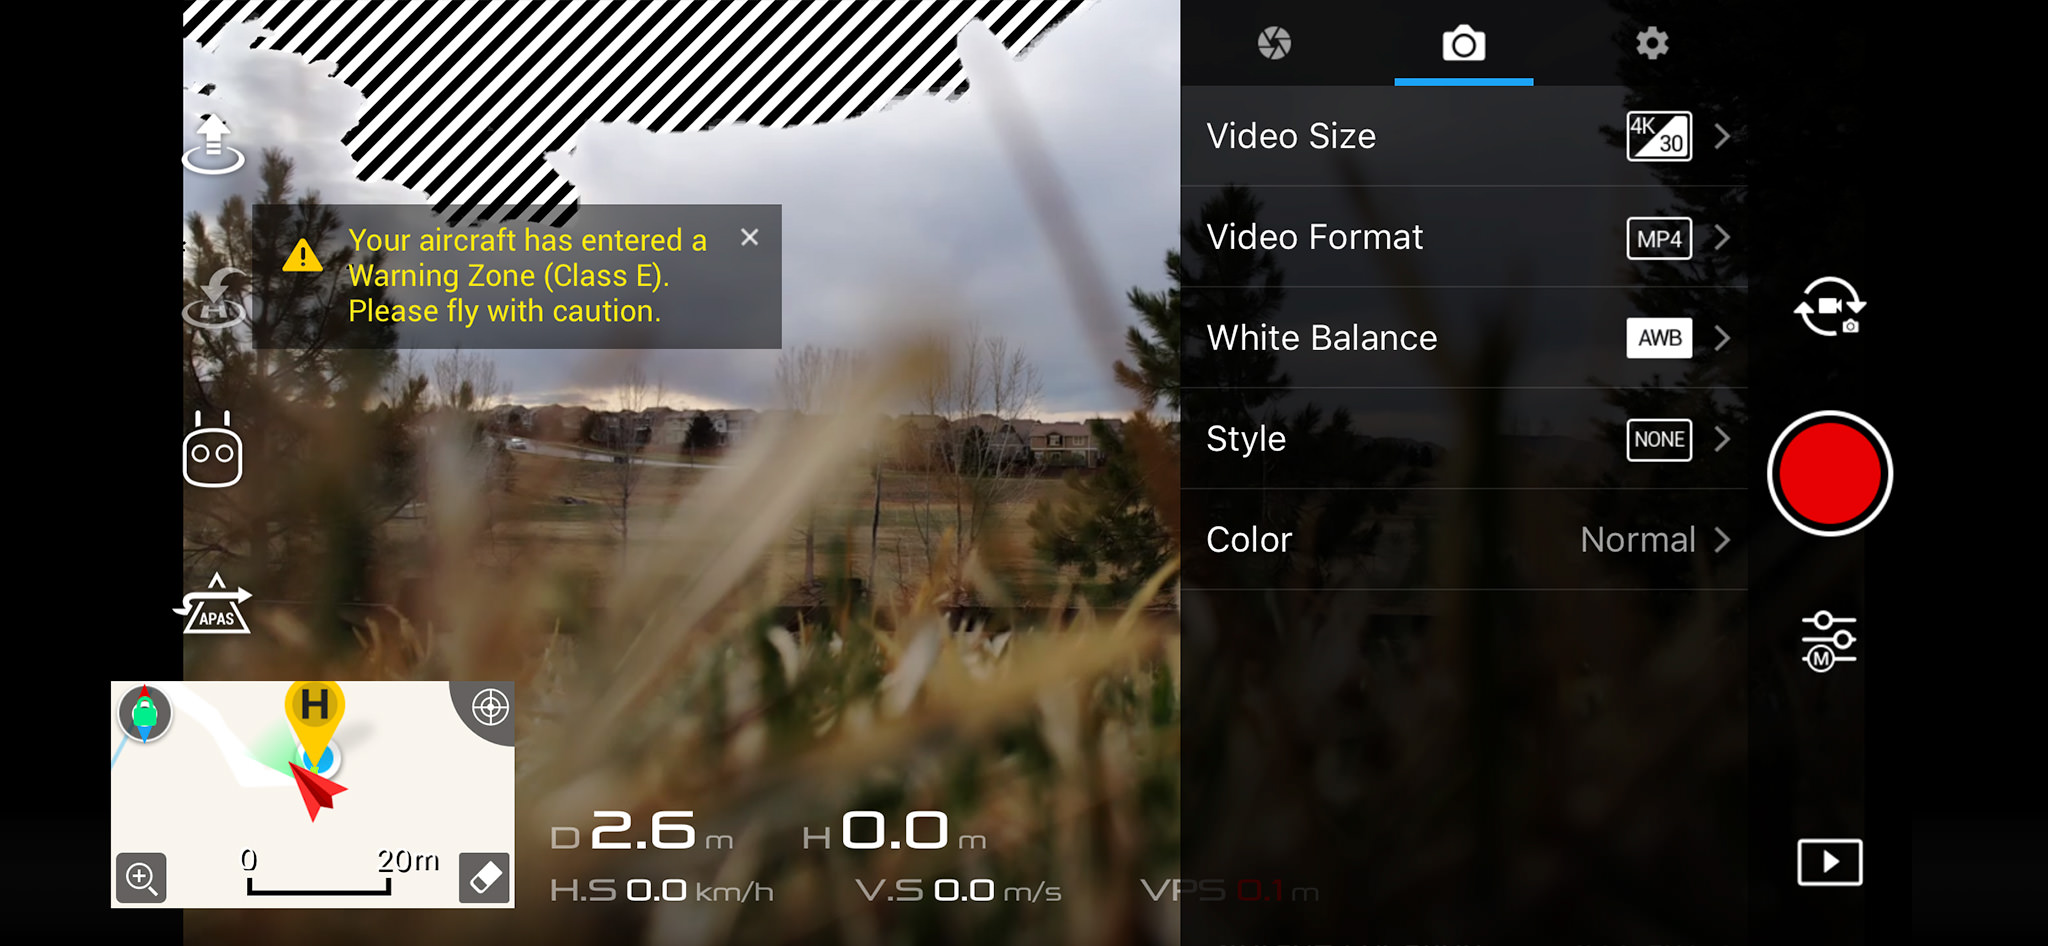
The next tab is the “camera” tab and that’s where you will find the most important settings for video recording. From here, you can pick video size (from 720p all the way to 4K), video format, white balance, style and color:
The last “settings” tab will allow you to go through other relevant functions. For example, you can turn on the histogram, over exposure warning, set up grid, anti-flicker, etc., as well as choose the storage where videos will be saved:
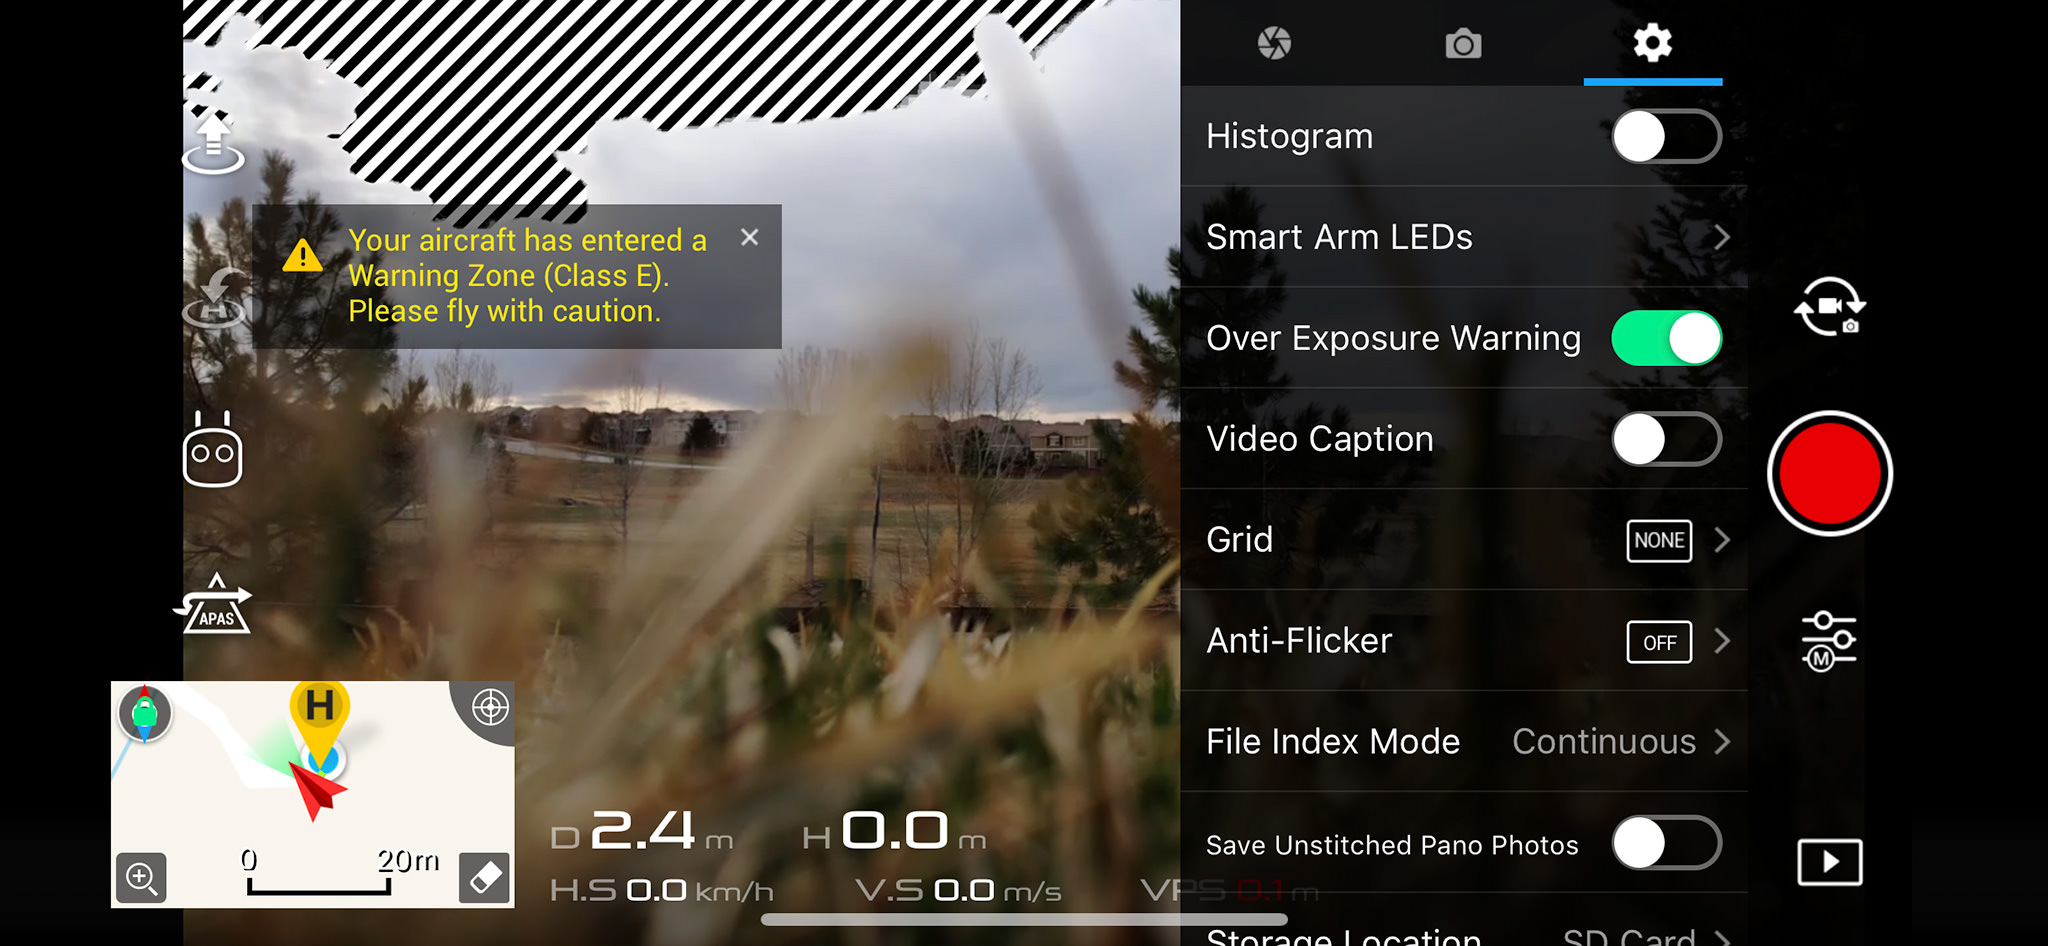
Photo Settings
To switch to photo mode, you simply press the icon above the red video record button, which switches the camera to photo mode. Once you do that, you will see that the menus will change accordingly. Again, there are three tabs in the photo mode as well. The first one is to control the exposure settings:
While the second one is there to set up photo options, such as photo release mode, image size, image format, etc:
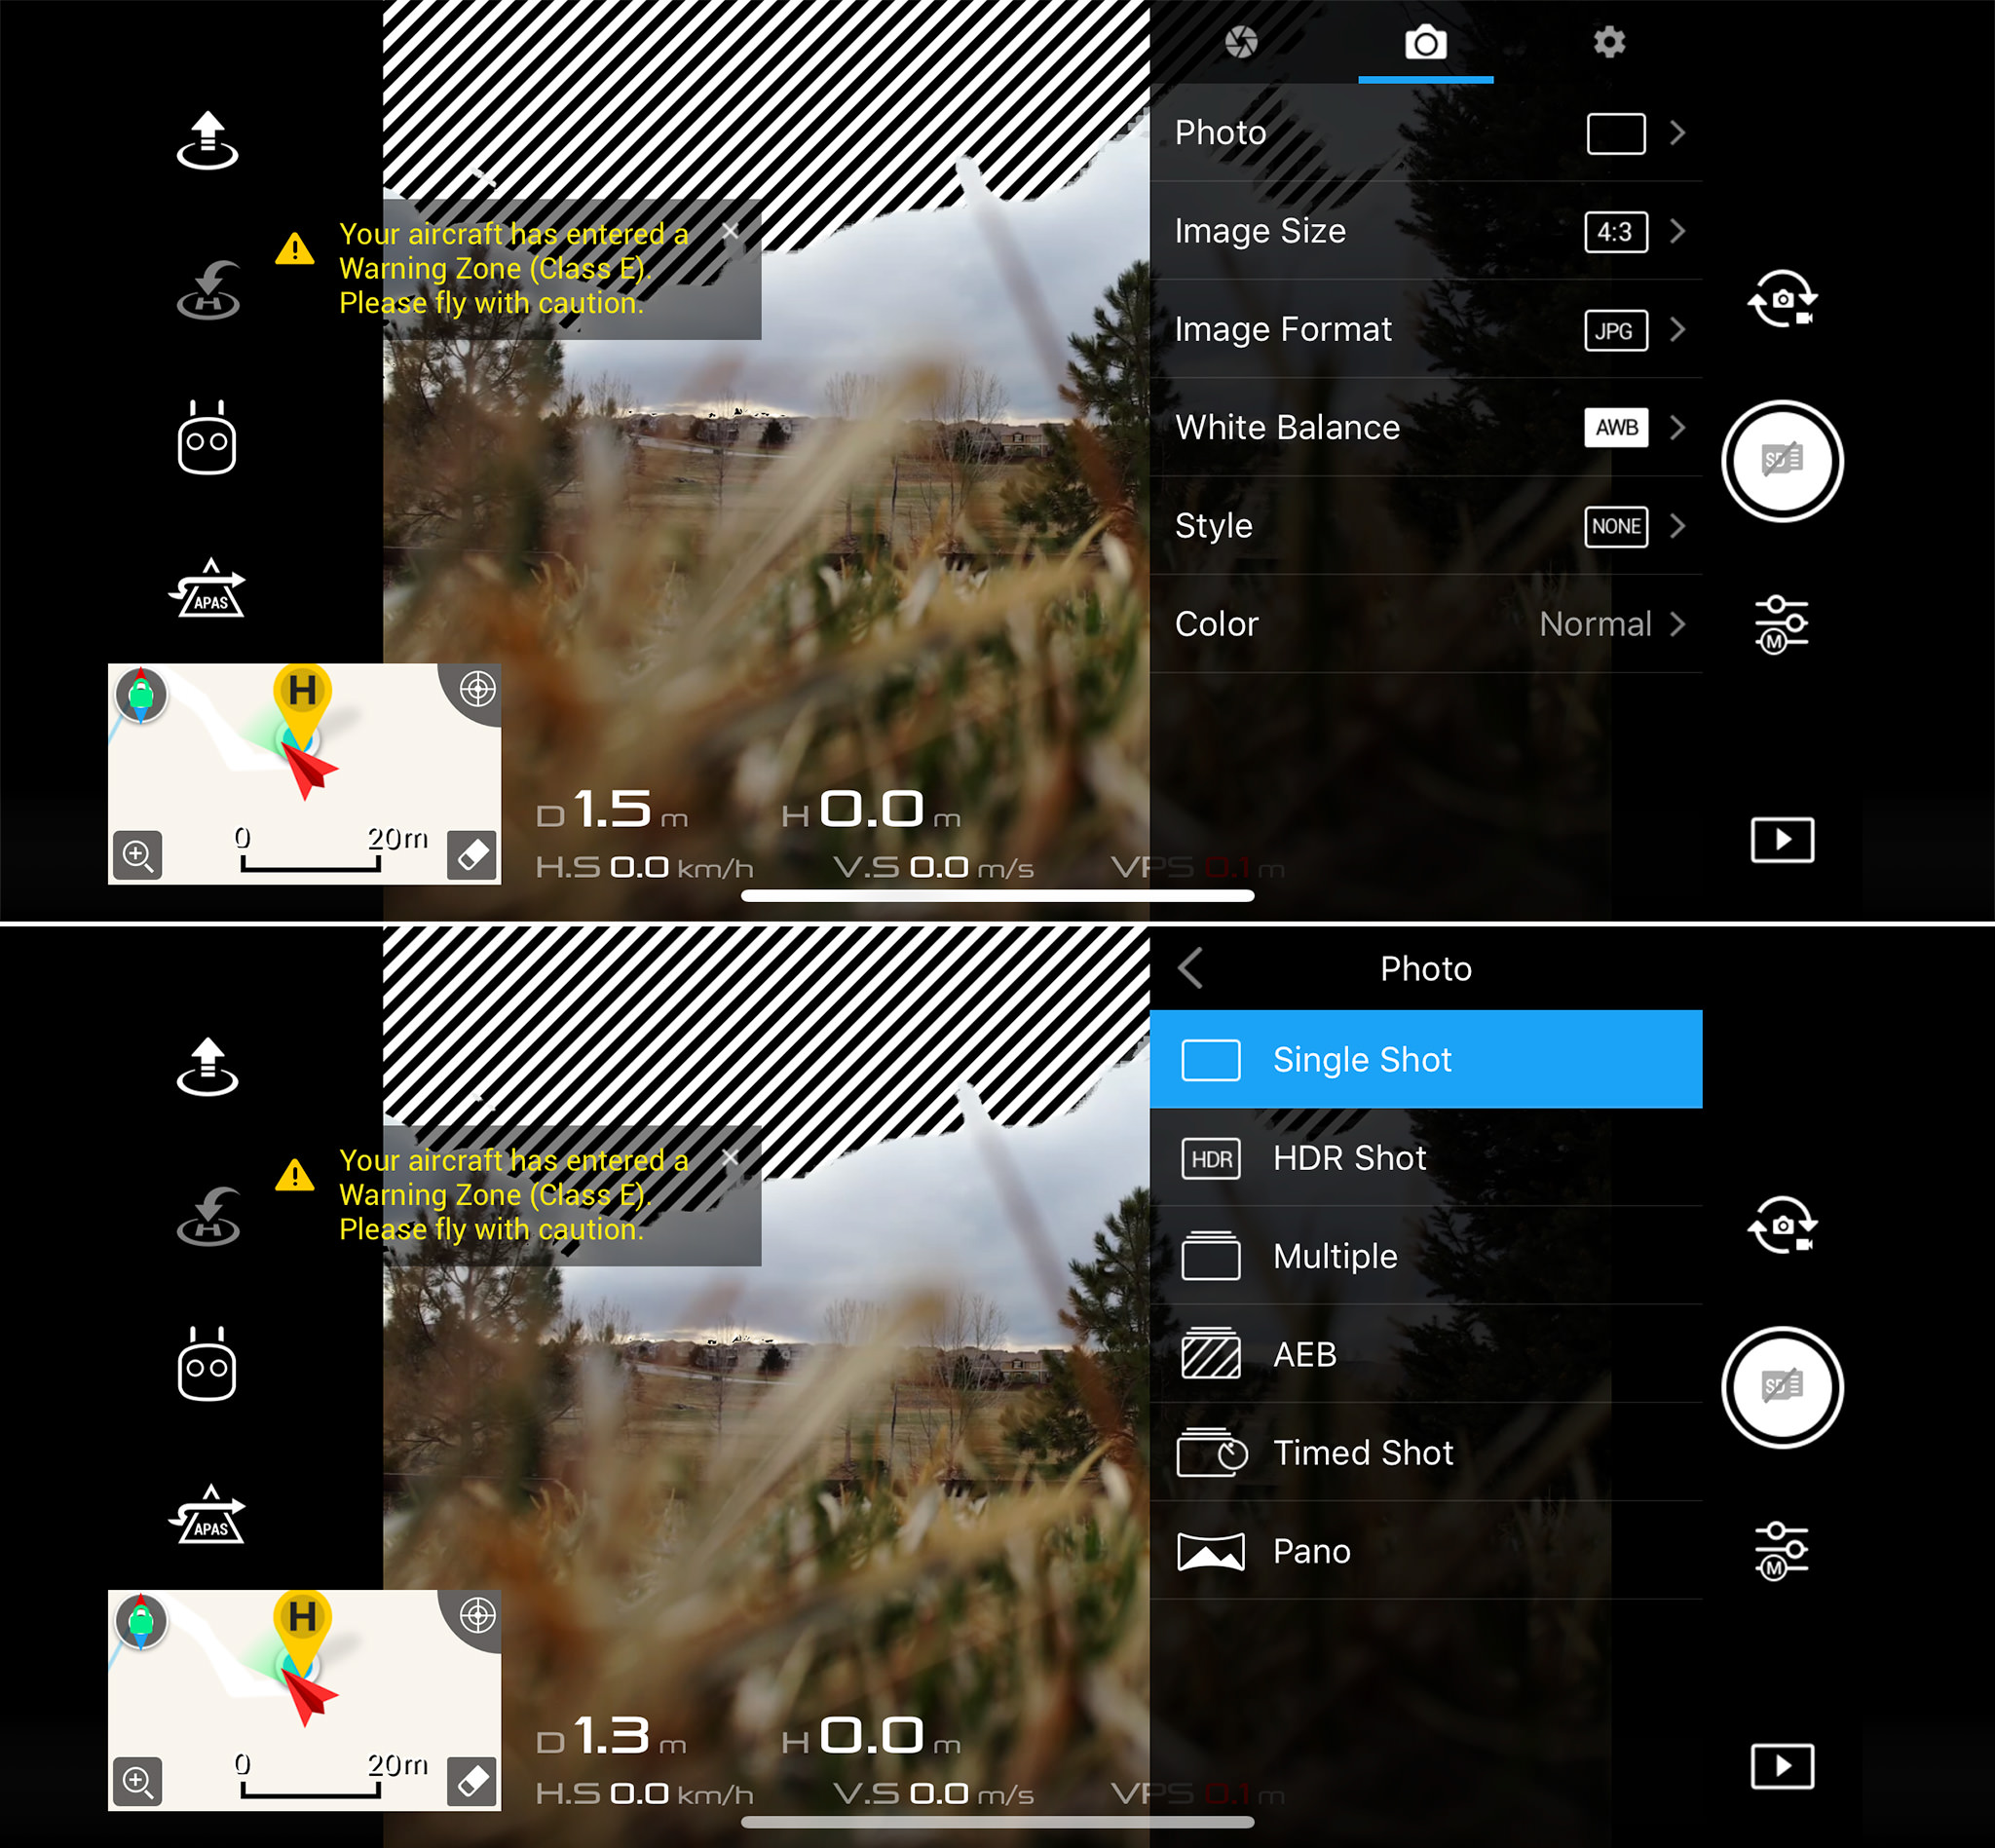
The first menu option is the one you will probably be accessing the most – that’s where you pick between different release modes. The menu option you definitely do not want to skip is “Image Format”. That’s where you have a chance to pick between RAW, JPEG, or JPEG + RAW. I would recommend to either go with RAW or JPEG + RAW options, so that you have more post-processing potential:

Keep in mind that the drone has a 20 MP camera, so you are better off taking pictures than trying to extract frames out of 4K footage.
One word of caution my drone by default was set to shoot 16:9 images, even when I choose RAW. After I did a bunch of shooting in Jordan and Turkey, it was disappointing to find out that all of my images were getting cropped to 16:9 aspect ratio in RAW format. I really don’t understand why DJI chose to crop RAW images when switching between different aspect ratios – I wish the native aspect ratio was actually preserved in RAW images, no matter what setting is chosen. I can understand cropping JPEG images, but RAW images should stay at their native resolution and aspect ratio in my opinion.
Other Features
Similar to the Mavic Air, the Mavic 2 Pro has a boatload of other features called “Quickshot” that you can try. Personally, I didn’t care for any of these, but some of them can be quite cool to try out. Below is a list of things you can do with the drone:
- Sphere Panorama Mode
- Slow Motion Video
- Quickshot Intelligent Flight Modes
- Asteroid
- Boomerang
- Rocket
- Circle
- Dronie
- Helix
You can read about these modes on DJI’s website in detail. To access these modes, you need to click the “Remote Control” icon on the left of the screen, then select “Quickshot” and pick one of the modes from the above list.
Lastly, there is a switch on the controller called “Sport”. This basically allows the drone to fly at its maximum speed of 72 kph, which is very fast. Unless you really know what you are doing, I would highly discourage from using this mode, because it disables all obstacle sensing and avoidance capabilities of the drone, so you might end up losing or crashing the drone pretty quickly.
Image Quality
Stepping up from a 1/2.3” sensor on the Mavic Air to a 1” sensor on the Mavic 2 Pro is a pretty big deal. If you are wondering about the size differences between the two, consider that a 1” sensor has a surface area of 116mm² vs 28mm² on a 1/2.3” sensor. That’s a huge difference, which translates to much better image quality for shooting both stills and video as a result of larger light gathering surface.
This shows very easily when looking at images and videos, especially when shooting in less than ideal lighting conditions. While with the Mavic Air you are basically limited to capturing images and video in broad daylight (as high ISO noise levels can get extreme and there is very limited dynamic range to work with), you can do way more with the Mavic 2 Pro and shoot in much worse conditions. I found this to be extremely valuable for landscape photography and videography in particular, since the prime time to shoot is typically around sunrises and sunsets, where there are often extreme differences between highlights and shadows.
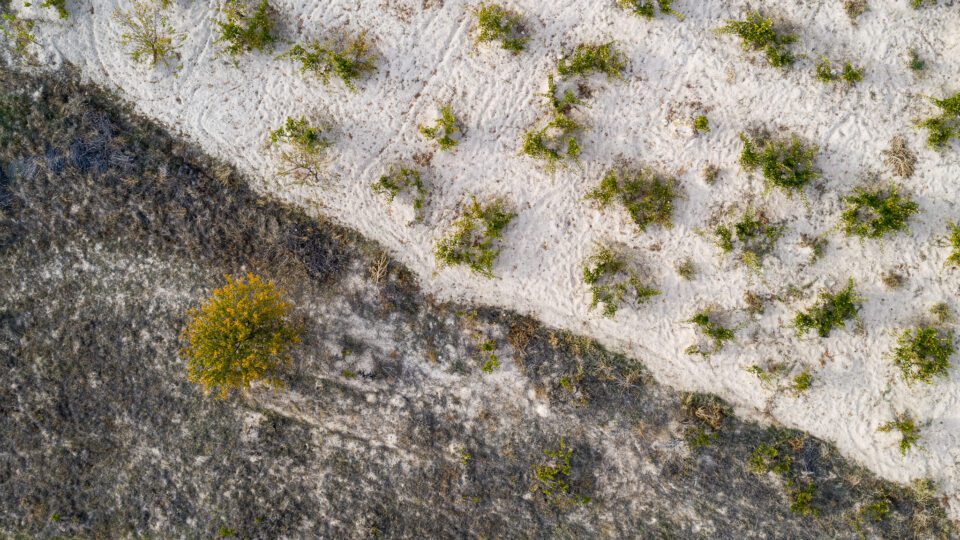
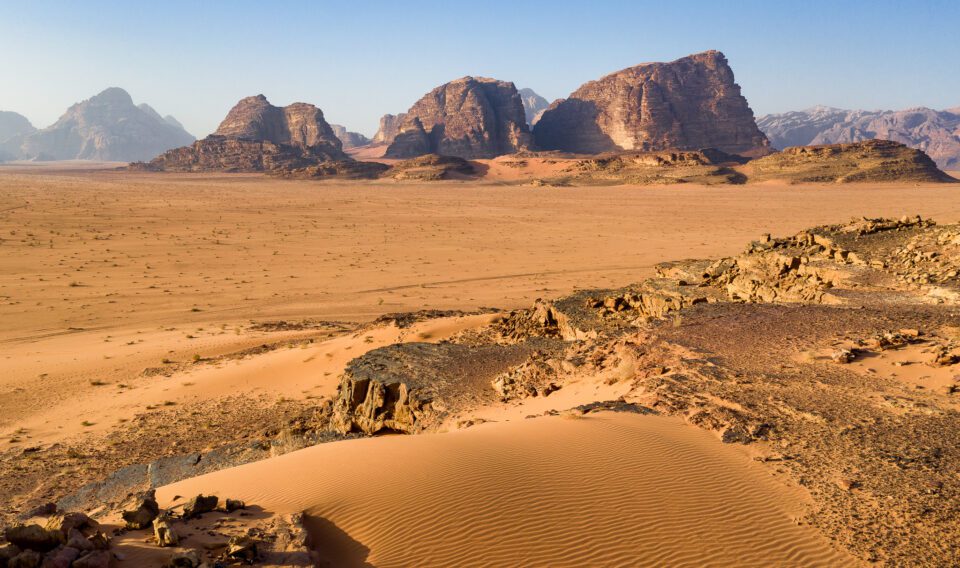
Sensor size also matters big time when recovering data from RAW images. Take a look at the below image:

Although it was captured at ISO 100, I had to recover quite a bit of detail in the shadows, which resulted in added noise. With a little bit of noise reduction in post-processing, I could make this into a solid shot. Had I shot the same scene with a much smaller sensor on the Mavic Air, the image would have been completely unusable. These kinds of things do matter when dealing with low-light and extreme conditions. I tried my best to keep my ISO at base ISO 100 when shooting, but in some situations I was able to shoot at higher ISOs without adding too much noise to my images, which was great.
By the way, you can also capture aerial panoramas with the drone. Here is a vertical panorama that I captured with about 6 images from top to bottom:
Video Quality
The same goes for capturing high-quality video. You will find a lot more latitude in dealing with video footage from a 1” sensor than from a 1/2.3” sensor. I shot the Mavic 2 Pro in Dlog-M 100% of the time and it was great to be able to color-grade the video footage in software without much effort. I was able to recover quite a bit of detail this way, especially when shooting in high contrast scenes. If you watch the YouTube video of Jordan one more time, you will see particular scenes where recovery was very important. In the scene with my Bedouin friend Mahmoud laying down and waving next to his campfire, it was already past sunset time and there wasn’t much light left to expose the scene correctly. And yet after loading the footage into Final Cut Pro and editing it, I was able to recover lots of detail – you can see that Mahmoud’s face is properly exposed without much visible noise.
By the way, it was very nice to find out that DJI released its D-Log LUT that you can load into your video editing software – you can download it from here. That’s what I used to color-grade the footage in the Jordan video.
Overall, I am very happy with the video performance of the Mavic 2 Pro. It is a huge step up from what the Mavic Air can do, especially in more challenging lighting conditions.
Summary
By now, you can probably already tell that I am a big fan of the Mavic 2 Pro. I have had a wonderful experience with it and I am happy to share some of the photographs and the footage I was able to get with our readers. Without a doubt, it is a truly versatile drone that can take stunning images and videos.
What about the Mavic Air? Do I still recommend it to our readers? Absolutely. In fact, I think both drones excel on their own. The Mavic Air is significantly lighter, cheaper and smaller compared to the Mavic 2 Pro, so it is perfectly suitable for doing more localized aerial work. If I need to grab quick footage of a subject during the day, I would not hesitate to use the Mavic Air. However, if I want a much more versatile tool for capturing distant landscapes or wildlife, or perhaps if I am dealing with a sunrise or sunset situation with a large dynamic range, then the Mavic 2 Pro is the right tool for the job.
Once again, congratulations to DJI for making such a phenomenal drone – it certainly deserves the high praises it received from the community, as welll as from our team at PL.
Where to Buy
you can buy it from Amazon from the following links:

Comments
Post a Comment